 Web Hosting
 Windows HostingBuilt for Windows apps and websites – stability, speed and flexibility
 Reseller HostingLaunch a hosting business without technical skills or expensive infrastructure
 Affiliate ProgramRefer customers and earn commissions from sales across our platform
 Domain SearchFind and secure a domain name in seconds with our quick lookup tool
 CO ZA Domains
 All DomainsExplore domain names from over 324 TLDs globally – all in one place
 Free Whois Lookup Tool South Africa
 VPS
VPS Website Builder
 Online ShopSet up a sleek eCommerce store with zero coding knowledge
 SSLs
SSLs SupportAccess help articles, how-tos, and everything about our services
 Blog
Blog Contact UsReach our team instantly via live chat or drop us an email
Your VPS just spun up. The terminal window sits open, cursor blinking, waiting for a command.
You have picked CyberPanel as your control panel. Now you need it running, cleanly, without breaking anything on a fresh server.
This guide walks through every step. From the first SSH connection to a secured, working panel, you can log in.
Table of Contents
What You Need Before You Start
Before you touch the terminal, check that your server meets a few basic conditions.
- Operating system: Ubuntu 20.04, Ubuntu 22.04, AlmaLinux 8, AlmaLinux 9, or CloudLinux 8. Skip CentOS 7 and CentOS 8. Both reached the end of life, so they no longer receive security patches.
- RAM: 1GB technically starts the installer, but 2GB or more gives you a smoother install and fewer stalls.
- Disk space: At least 10GB free, with SSD storage preferred over spinning disks.
- Root access: You need to log in as root. The installer does not support sudo, so that a non-root account will fail partway through.
- A public IP or DNS record: Point a domain or subdomain at your server IP now. That way, the panel is reachable once installation finishes.
- A clean server: No other control panel or web server is already installed. Apache, Nginx, or a leftover panel on ports 80 and 443 will conflict with the installer.
Confirm each of these first. A missed requirement here often shows up later as a confusing error mid-install.
Step 1: Connect to Your VPS via SSH
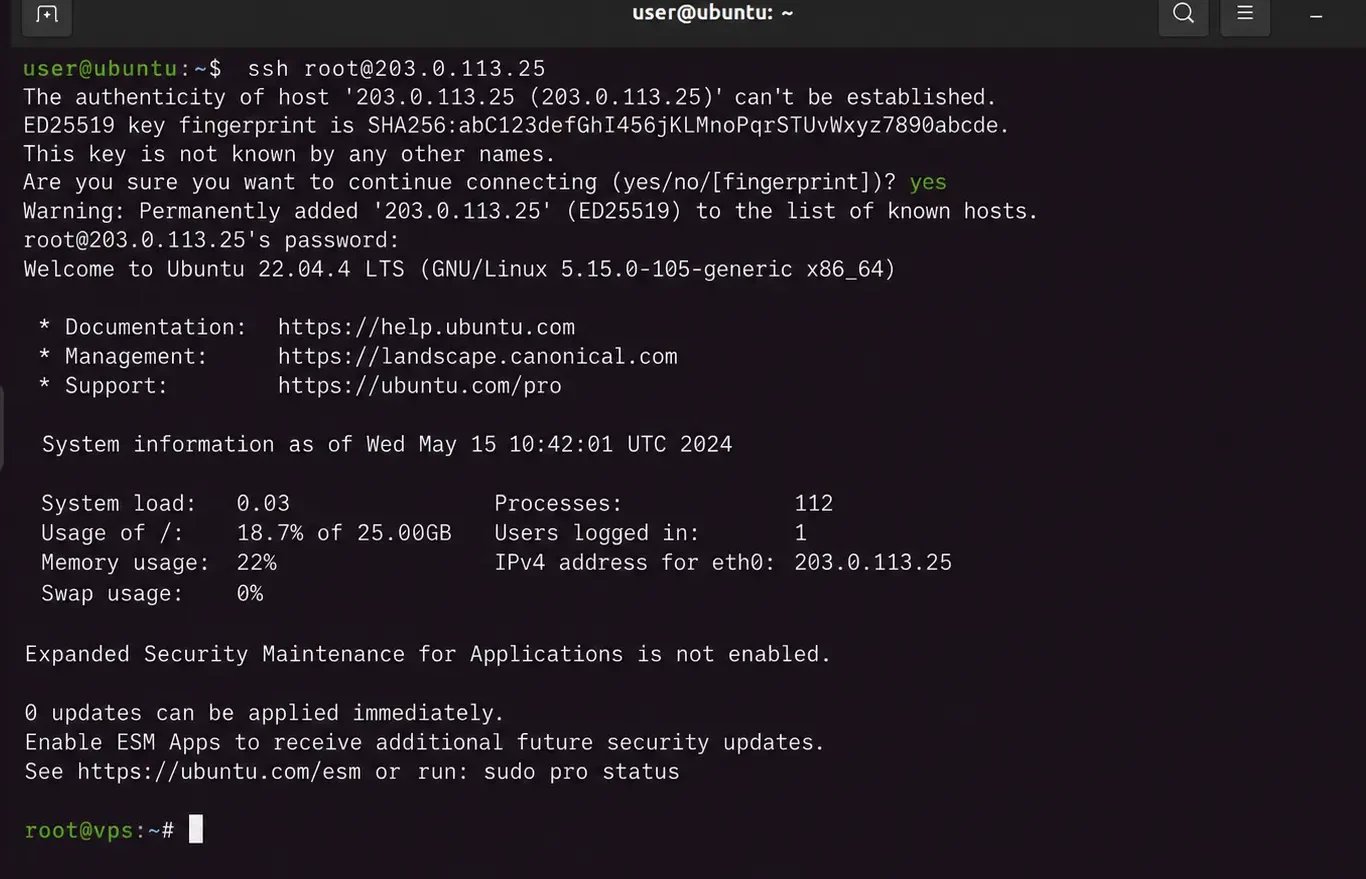
Open your terminal (or PuTTY, if you’re on Windows) and connect as root:
ssh root@your_vps_ipEnter your root password when the prompt asks for it.
If the connection gets refused on the first try, wait a moment and try again. Freshly provisioned VPS instances sometimes take a minute to finish booting their SSH service.
Once connected, you should see a command prompt tied to your server. That confirms you’re in.
Step 2: Update Your Server Packages
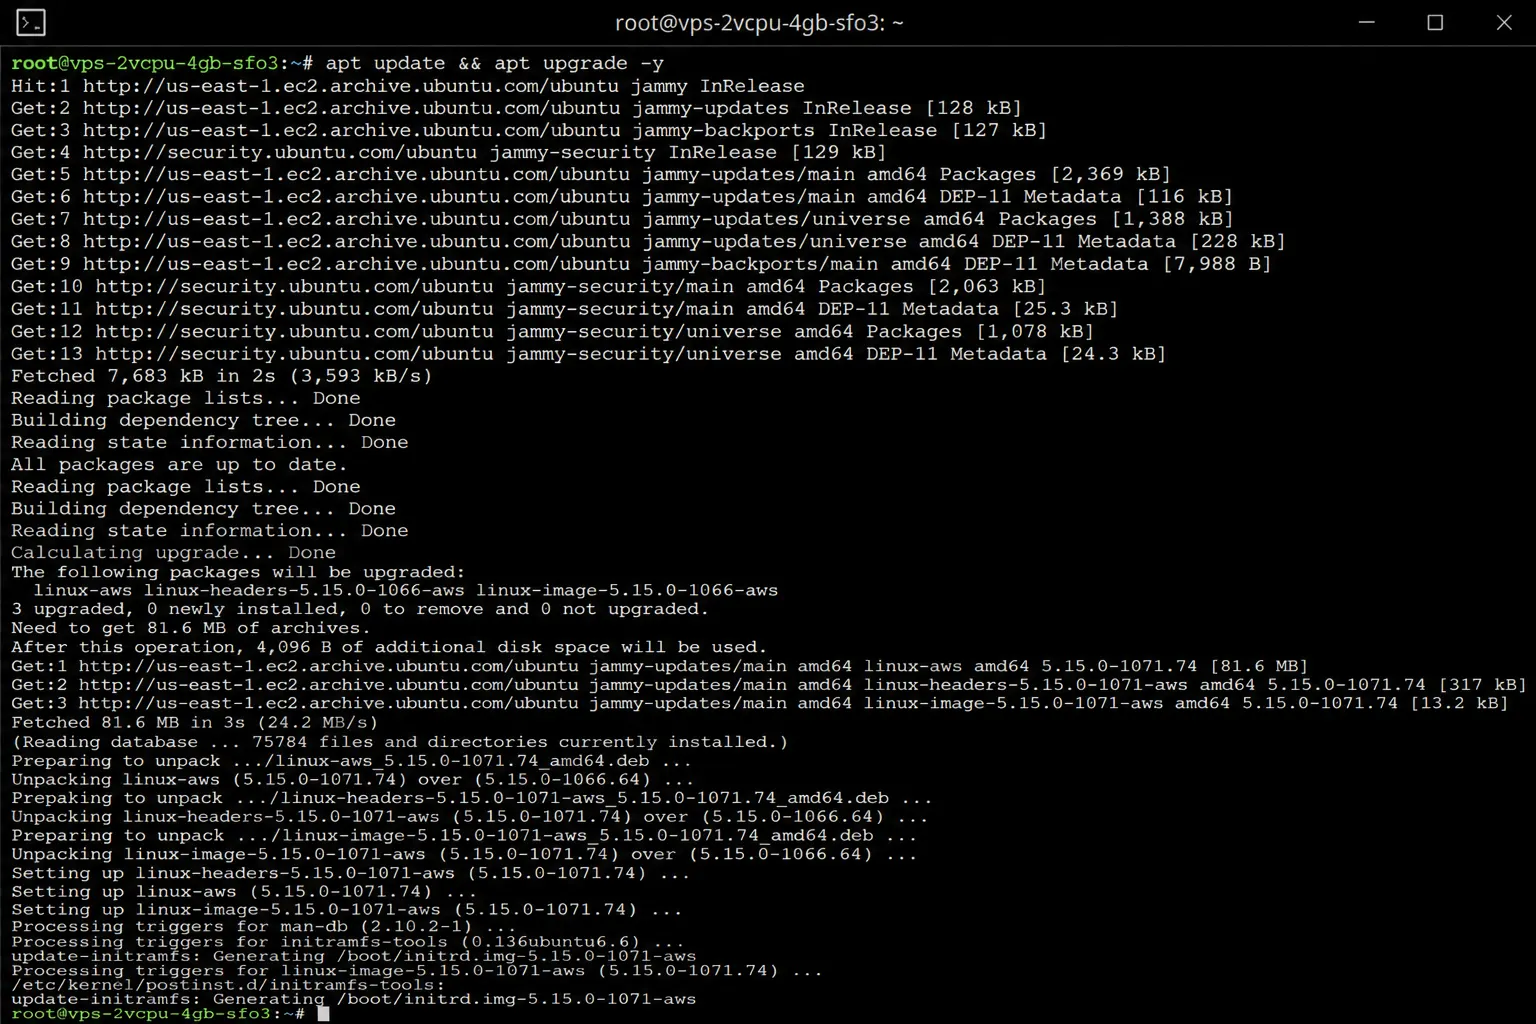
Never skip this step. An outdated package list causes a large share of failed CyberPanel installs.
On Ubuntu or Debian-based systems, run:
apt update && apt upgrade -yOn AlmaLinux or CentOS-based systems, run:
dnf update -yIf the update touched your kernel, reboot the server before continuing:
rebootReconnect over SSH once the server comes back online, then move on.
Step 3: Set Your Server Hostname
CyberPanel installs more smoothly when your server already has a real hostname. Set a fully qualified domain name (FQDN) before you run the installer.
Run this command, replacing the domain with your own:
hostnamectl set-hostname server.yourdomain.comAn FQDN pairs a host label with a domain, like server.yourdomain.com instead of just “server.” This step is not strictly required, but it prevents naming issues later.
Step 4: Run the CyberPanel Installation Script
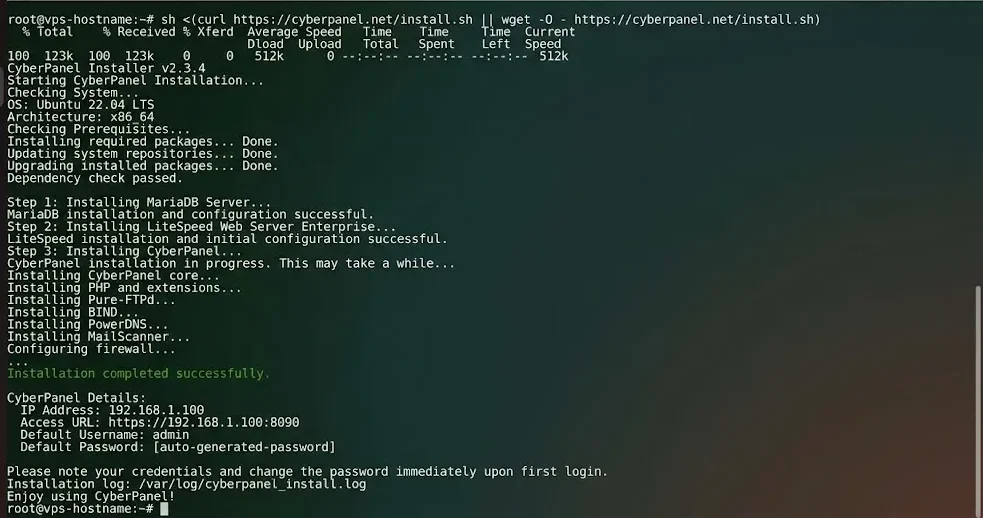
This is the step that does the heavy lifting. Run this command as root:
sh <(curl https://cyberpanel.net/install.sh || wget -O - https://cyberpanel.net/install.sh)The installer will walk you through a short series of prompts. Here’s what each one actually means:
- OpenLiteSpeed vs. LiteSpeed Enterprise: OpenLiteSpeed is free and works well for most sites. LiteSpeed Enterprise costs money but handles heavier traffic more efficiently.
- Admin password: Choose your own password instead of accepting the auto-generated one. Type “y” when prompted, then set something strong.
- Memcached: A caching layer that speeds up database-heavy sites. Say yes unless you have a specific reason not to.
- Redis: Another caching and data store option, often used alongside WordPress or custom apps. Safe to include.
- Watchdog: A background process that restarts services if they crash. Leave this enabled.
The full install usually takes five to fifteen minutes. Lower-spec VPS plans can take longer, so give it time before assuming something failed.
Step 5: Open the Firewall for CyberPanel
Some VPS setups block port 8090 by default, even after a clean install. If the panel does not load, check this before anything else.
For CentOS, AlmaLinux, or other firewalld-based systems, run:
firewall-cmd --zone=public --add-port=8090/tcp --permanent

firewall-cmd --reload

For Ubuntu or Debian systems using UFW, run:

ufw allow 8090/tcp

ufw reload
This opens the port CyberPanel needs to serve its login page. Skip this step only if your provider has already confirmed the port is open.
Step 6: Access and Verify Your CyberPanel Installation
Once the script finishes, open a browser and go to:
https://your_vps_ip:8090Your browser will flag the connection as unsafe, since CyberPanel ships with a self-signed certificate at first. Click through the warning to continue.
Log in with “admin” as the username, along with the password you set during installation.
Before you start building anything, confirm the panel is actually healthy. Run this check over SSH:
systemctl status lscpdIf the service shows as active and running, your install succeeded. If not, head to the troubleshooting section below.
Step 7: Secure CyberPanel After Installation
A working panel is not the same as a safe one. Take a few minutes now to lock things down.
- Change the default password if you accepted the auto-generated one during setup. Do this from the CyberPanel dashboard under user settings.
- Turn on the built-in firewall, along with fail2ban. Both ship with CyberPanel and block repeated login attempts from unknown IPs.
- Install a real SSL certificate for the panel itself. CyberPanel supports free Let’s Encrypt certificates, which replace the self-signed certificates you saw earlier.
- Keep CyberPanel updated. New releases patch known vulnerabilities, so check for updates from the dashboard on a regular basis.
These steps take maybe ten minutes total. Skipping them leaves an exposed admin port sitting on the open internet.
Troubleshooting Common CyberPanel Installation Issues
Even a careful install runs into problems sometimes. Here are the most common ones, and how to fix them.
I) 503 error after installation
This usually points to a broken Python environment. Try reinstalling the required packages:
source /usr/local/CyberCP/bin/activate

pip install --ignore-installed -r /usr/local/CyberCP/requirements.txt

deactivate

virtualenv --system-site-packages /usr/local/CyberCP

systemctl restart lscpd
II) Installer hangs on a low-RAM VPS.
If your server sits close to the 1GB minimum, the installer can freeze mid-process. Add temporary swap space before retrying:
fallocate -l 1G /swapfile

chmod 600 /swapfile

mkswap /swapfile

swapon /swapfile
Then run the install script again.
III) Panel not loading on port 8090
Sometimes the installer does not open port 8090, especially on OpenVZ-based VPS plans. Confirm the port is actually open:
firewall-cmd --zone=public --add-port=8090/tcp --permanent

firewall-cmd --reload
If the port is already open, check that nothing else is using it. Another panel or a leftover process can grab port 8090 first.
IV) Installer fails during the SSL certificate step (acme.sh error)
CyberPanel uses acme.sh to issue its first SSL certificate during install. This step fails if your server cannot reach acme.sh’s update servers.
Check your outbound network connection, then run the install script again:
sh <(curl https://cyberpanel.net/install.sh || wget -O - https://cyberpanel.net/install.sh)A firewall or provider-level network block usually causes this one, not a problem with CyberPanel itself.
V) Installer fails with a MySQL or database error.
An error mentioning MySQLdb or “access denied” usually points to a broken MariaDB setup from a previous install attempt. Remove the partial install, then start fresh:
apt purge mysql-server mariadb-server -yUse dnf remove mariadb-server -y instead of AlmaLinux or CentOS. Reinstalling on a genuinely clean VPS solves this faster than patching a half-finished setup.
VI) Installer conflicts with an existing web server or panel.
CyberPanel expects a blank server. If Apache, Nginx, or another control panel already claims ports 80 and 443, the install will fail or behave strangely.
Stop and remove the conflicting service first, or start fresh on a clean VPS instance.
VII) DNS is not pointing to the panel
If your domain does not load the panel, check that your DNS A record points to the correct server IP.
DNS changes can take a few hours to spread across the internet, so give it time before troubleshooting further.
VIII) Where to find install logs
For any issue not listed here, check the installer logs directly:
cat /var/log/cyberpanel_install.logCyberPanel also keeps its own log viewer inside the dashboard, reachable at:
https://your_vps_ip:8090/serverstatus/cyberCPMainLogFileThe log usually names the exact step that failed, which narrows down your next move.
FAQs
Is CyberPanel free to use?
Yes, the OpenLiteSpeed version of CyberPanel is completely free, with no limit on the number of domains you host. The LiteSpeed Enterprise version costs money, but it includes a license for one domain to start.
What is the difference between CyberPanel and cPanel?
CyberPanel runs on OpenLiteSpeed or LiteSpeed, while cPanel typically runs on Apache. CyberPanel is free at its base tier. cPanel charges a license fee regardless of which plan you choose.
Can CyberPanel be installed on shared hosting?
No. CyberPanel needs root access to install and run properly. Shared hosting accounts don’t give you that level of access, so a VPS or dedicated server is required.
Why does my CyberPanel installation get stuck or fail?
Most stalled installs trace back to low RAM, an outdated package list, a blocked port, or a lost SSH connection mid-script. Check the troubleshooting section above for the specific fix.
Manage your VPS Using CyberPanel
You now have a working, secured CyberPanel installation running on your VPS.
From here, you can create your first website, set up email, and issue SSL certificates. No more command line required for any of that.
If your current VPS feels tight on resources during setup, pay attention to that.
CyberPanel runs best with at least 2GB of RAM. A low-spec plan will keep causing the same stalls you just fixed.
A Truehost VPS plan sized for CyberPanel gives your panel that headroom from day one, so you spend less time troubleshooting and more time building.