 Web Hosting
 Windows HostingBuilt for Windows apps and websites – stability, speed and flexibility
 Reseller HostingLaunch a hosting business without technical skills or expensive infrastructure
 Affiliate ProgramRefer customers and earn commissions from sales across our platform
 Domain SearchFind and secure a domain name in seconds with our quick lookup tool
 CO ZA Domains
 All DomainsExplore domain names from over 324 TLDs globally – all in one place
 Free Whois Lookup Tool South Africa
 VPS
VPS Website Builder
 Online ShopSet up a sleek eCommerce store with zero coding knowledge
 SSLs
SSLs SupportAccess help articles, how-tos, and everything about our services
 Blog
Blog Contact UsReach our team instantly via live chat or drop us an email
Your friend tries to join your Minecraft server and gets a timeout error again.
Overnight, your home internet swapped your public IP, and the connection broke.
You already reset the router once this month. That moment is usually what pushes people to move their server off a home network and onto a VPS instead.
Home hosting works for a while, then something breaks. Here is what usually goes wrong, and why a VPS solves each problem directly.
- Your IP address keeps changing. Most home connections use a dynamic IP. When your ISP assigns a new one, every friend’s saved server address stops working.
- Upload speed caps your player count. Home internet plans favor download speed. A handful of players can push your upload bandwidth past its limit, and everyone starts lagging.
- Running a server 24/7 costs more than people expect. A gaming PC left on all day adds up on your electricity bill, even before counting the wear on the hardware.
- A VPS starts cheaper than most alternatives. Truehost’s entry-level Cloud VPS 1 plan runs from around R80 to R98.80 a month, depending on your billing term.
Once the server lives on a VPS, none of these problems apply. Your friends get one address that never changes.
This guide walks through the full setup on a Truehost VPS in South Africa, from picking a plan to fixing the errors that trip up most first-time server owners.
Table of Contents
Choosing the Right VPS Plan (RAM Requirements)
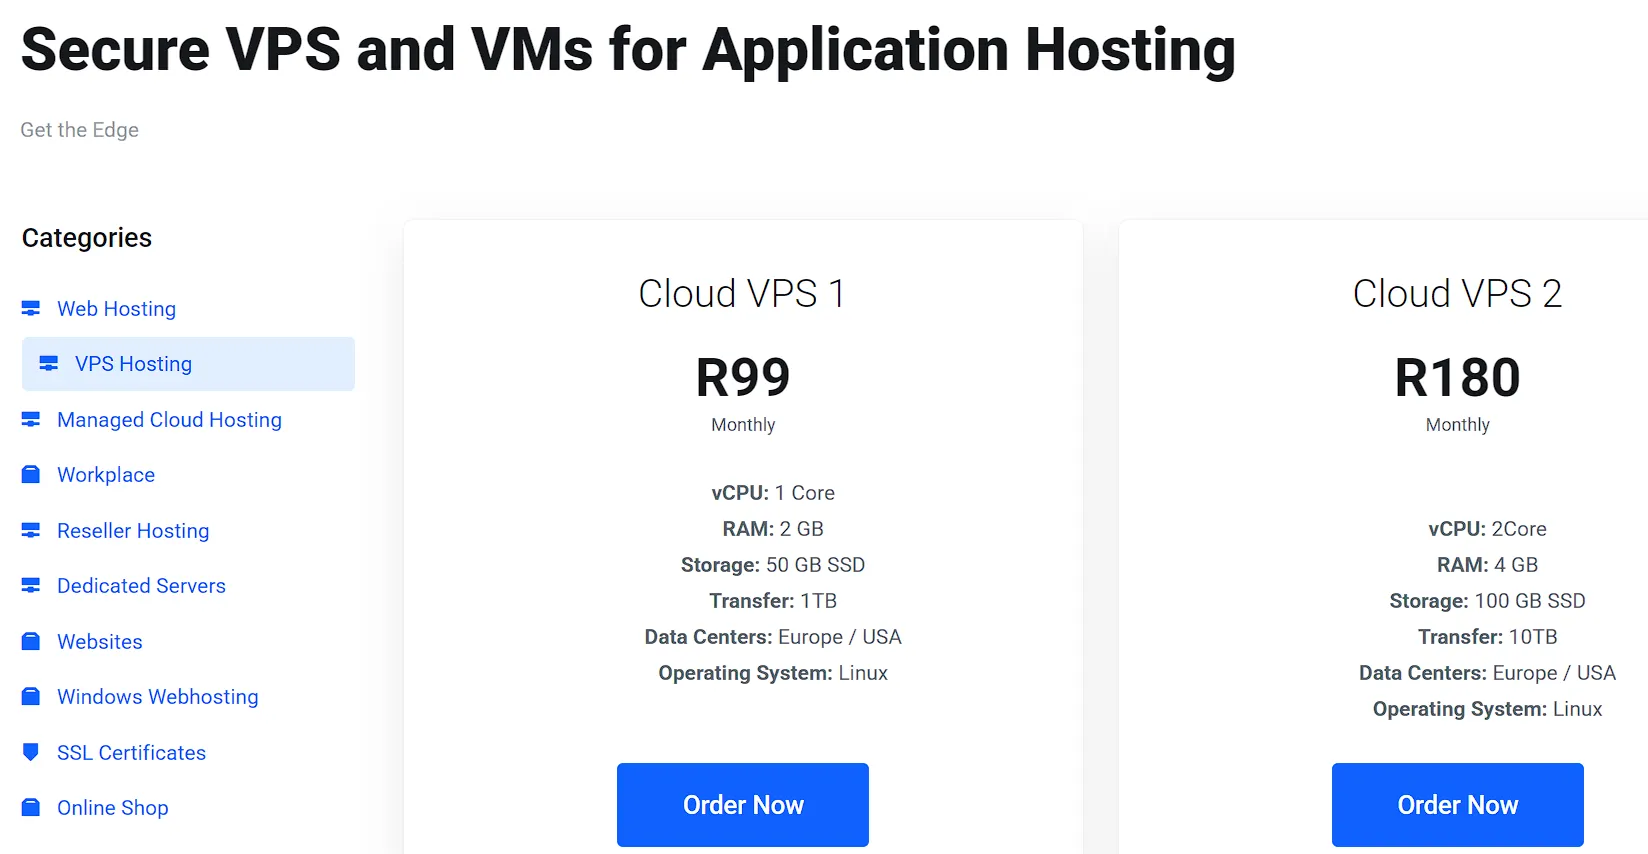
Minecraft servers lean on memory more than processing power. A server with plenty of RAM and a modest CPU will usually outperform the reverse setup. Use this table as a starting point.
| Players | Minimum RAM | Notes |
|---|---|---|
| 2 to 4 | 2GB | Fine for vanilla survival with a small friend group |
| 5 to 10 | 4GB | Comfortable for a few plugins or a light modpack |
| 10 or more, or heavily modded | 6GB or more | Needed once mods or plugins stack up |
Truehost’s South African VPS lineup maps cleanly onto these tiers:
- Cloud VPS 1 gives 1 vCPU and 2GB RAM, a solid fit for R 90.00 a small group of friends playing vanilla Minecraft for a month.
- Cloud VPS 2 gives 2 vCPU and 4GB RAM, the better pick once plugins or a modest player count enter the picture for R 160.00 a month.
- Cloud VPS 3 steps up further, for larger groups or heavier modpacks for R 500.00 a month.
If you have never touched a Linux terminal, a managed VPS plan hands the setup and patching to Truehost’s team.
An unmanaged plan costs less, but it requires you to run every command yourself. This guide covers the unmanaged path, since that is where the real learning happens.
What You Need Before You Start
Gather these before opening a terminal window.
- A VPS running Ubuntu 24.04 or Debian, with root or SSH access
- An SSH client (Terminal on Mac and Linux, PuTTY on Windows)
- Minecraft Java Edition is installed on your own computer
- Your VPS’s public IP address, found inside your Truehost control panel
With those ready, the actual setup takes well under an hour.
Step 1: Connect to Your VPS and Update the System
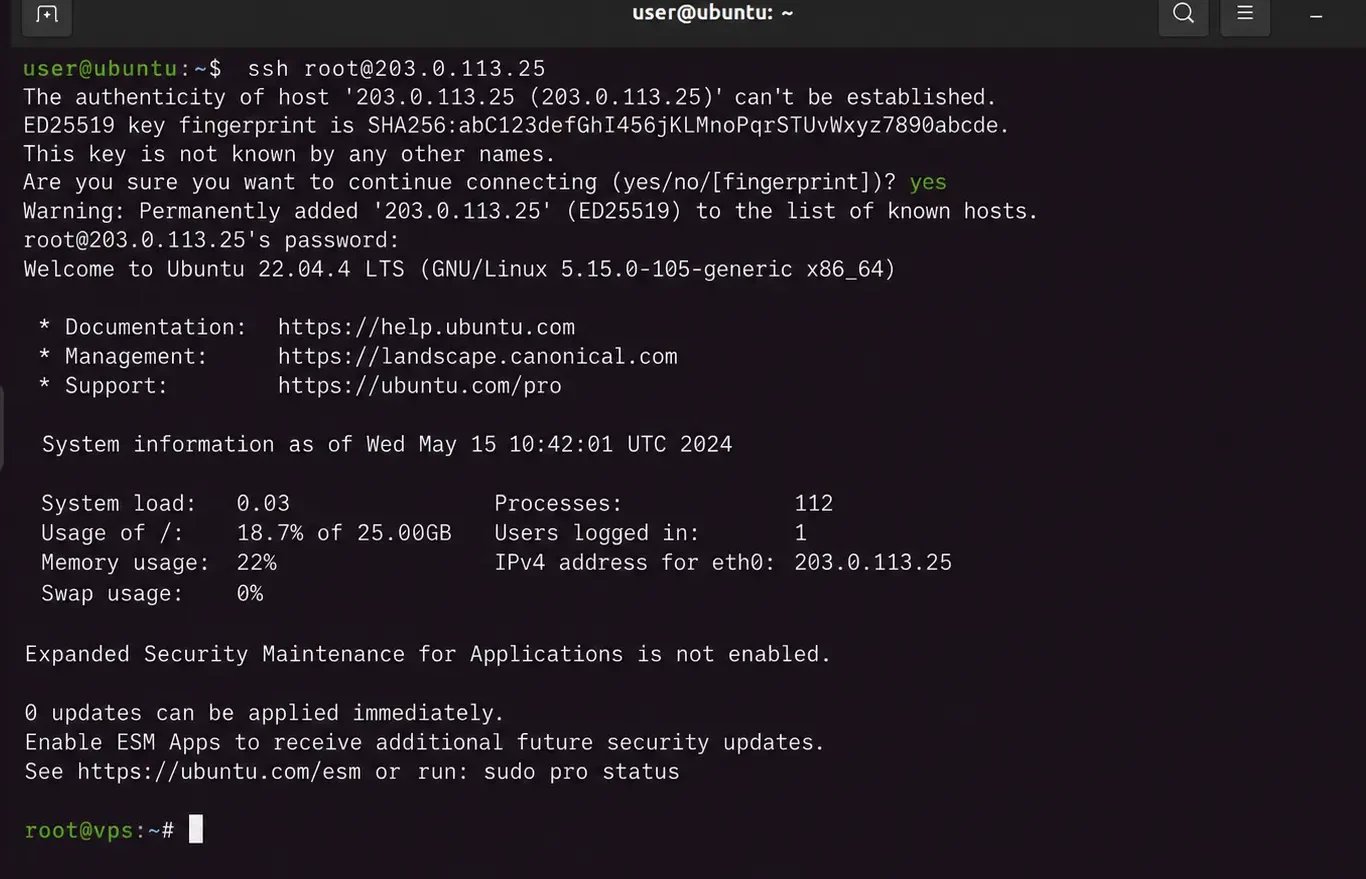
Open your SSH client and log in with the IP address from your Truehost dashboard.
ssh root@your_server_ipOnce connected, update every package to its latest version.
apt update && apt upgrade -yNext, create a dedicated user for the Minecraft process instead of running everything as root.
adduser minecraft

usermod -aG sudo minecraft

su - minecraft
Running the server as root works, but it hands full system access to any bug or exploit in the server software. A dedicated user keeps that risk contained.
Step 2: Install the Correct Java Version
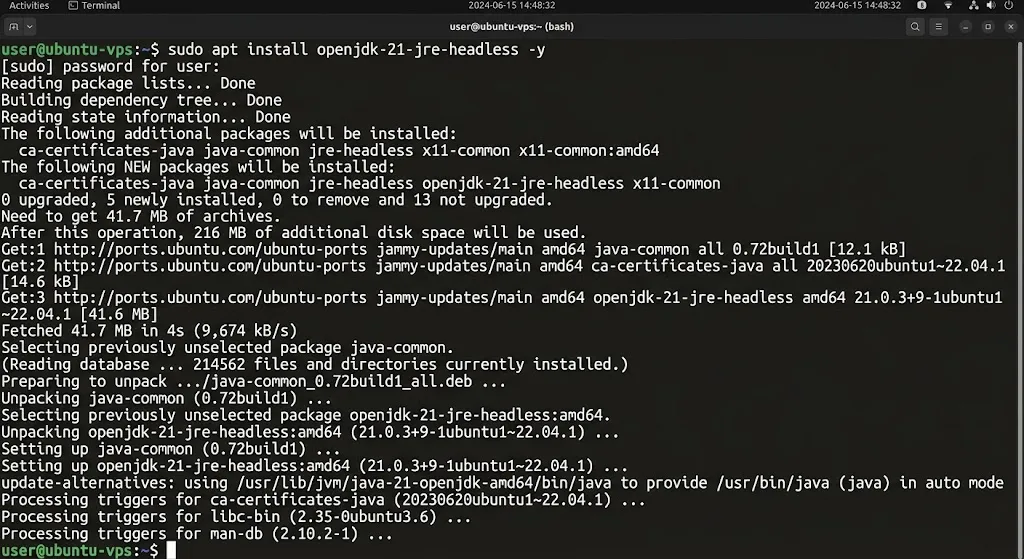
Minecraft’s Java requirement depends on which version you plan to run. Current releases need Java 21 or newer.
sudo apt install openjdk-21-jre-headless -yConfirm the install worked.
java -versionAn older Java version will not throw a clear warning up front. Instead, the server crashes later with a confusing error. Getting this step right now saves a troubleshooting session down the line.
Step 3: Download and Configure the Server Files
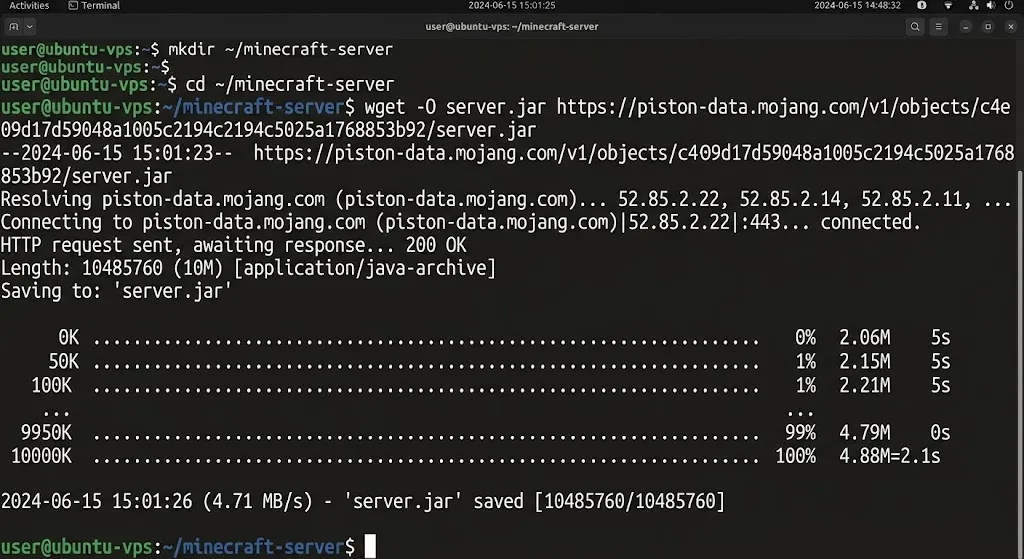
You have a choice of server software here. The official Mojang jar runs vanilla Minecraft with no extras. Paper and Spigot add plugin support and better performance under load.
Forge supports mods. Pick based on what you plan to run, since switching later means starting the world fresh in some cases.
Make a folder for the server and download the jar.
mkdir ~/minecraft-server

cd ~/minecraft-server

wget -O server.jar https://your-chosen-source/server.jar
Run the jar once to generate the EULA file.
java -jar server.jar noguiThe server stops immediately and creates eula.txt. Open that file and change the line to accept the terms.
nano eula.txtChange eula=false to eula=true, then save and close the file.
Before starting the server for real, open server.properties and set the basics that matter most.
difficultycontrols how hard the game is for your playersgamemodesets survival, creative, or another mode by defaultmax-playerscaps how many people can join at once
Step 4: Allocate RAM and Start the Server
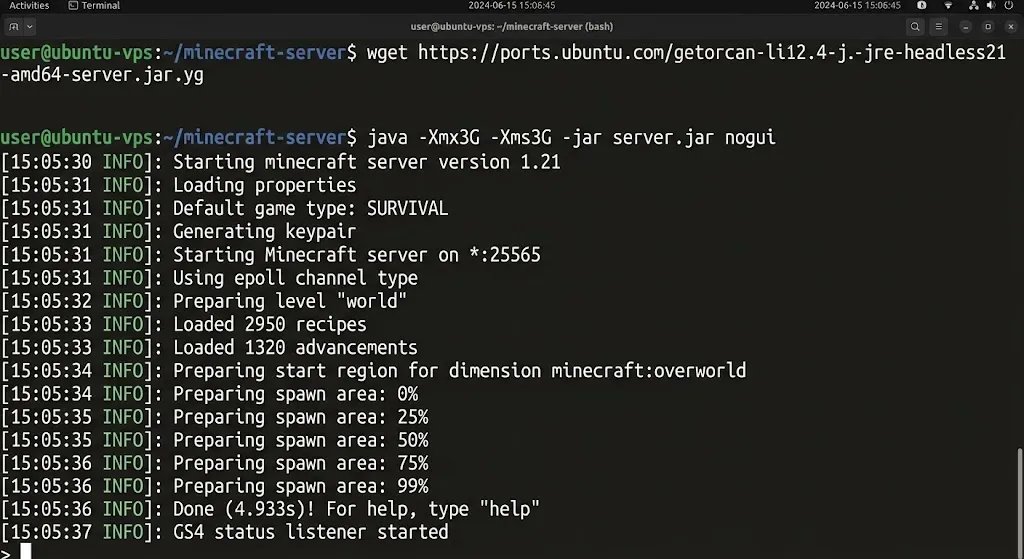
The Xmx and Xms flags tell Java how much memory the server can use. Xmx sets the maximum, and Xms sets the starting amount.
Match both to your VPS plan, leaving room for the operating system itself.
For a 4GB Cloud VPS 2 plan, a reasonable starting command looks like this.
java -Xmx3G -Xms3G -jar server.jar noguiSetting Xmx to the full 4GB leaves nothing for the system, which invites crashes later.
Watch the first startup log closely. A clean run ends with a message confirming the world has finished generating.
Step 5: Add Swap Space as a Safety Net
A 2GB or 4GB VPS can run into memory pressure during busy moments, even with the flags set correctly.
Swap space gives the system a buffer instead of killing the Java process outright.
sudo fallocate -l 2G /swapfile

sudo chmod 600 /swapfile

sudo mkswap /swapfile

sudo swapon /swapfile
Make the swap file permanent by adding it to /etc/fstab.
echo '/swapfile none swap sw 0 0' | sudo tee -a /etc/fstabThen lower theswappiness setting, so the system only reaches for swap during real spikes rather than routine play.
sudo sysctl vm.swappiness=10Swap is a backup, not a substitute for enough RAM. Treat it as insurance, not a way to run a bigger server on a smaller plan.
Step 6: Keep the Server Running After You Disconnect
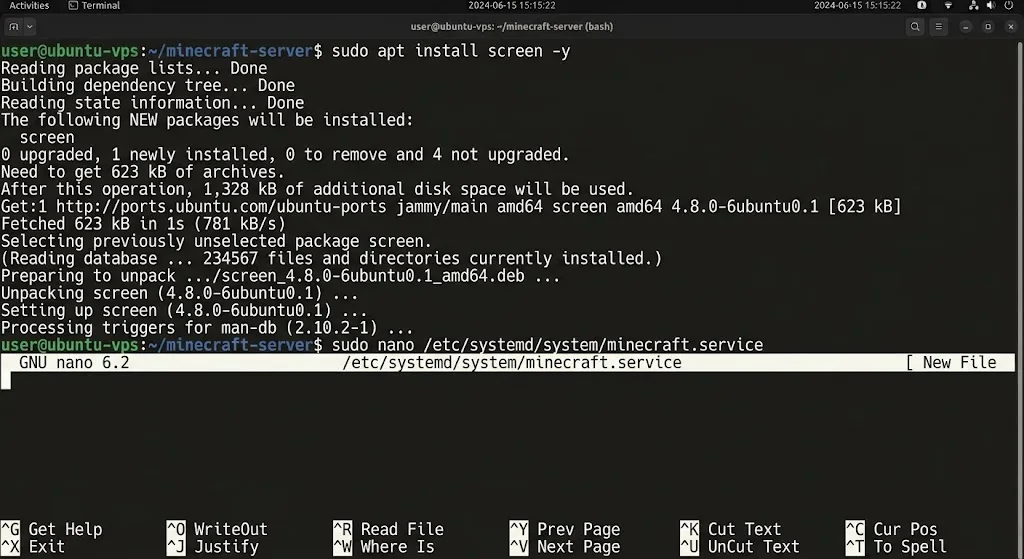
Closing your SSH session normally kills the server along with it. A screen session paired with a systemd service solves this cleanly, giving you both console access and automatic restarts.
Install the screen first.
sudo apt install screen -yCreate a systemd service file.
sudo nano /etc/systemd/system/minecraft.servicePaste in the following, adjusting the path and memory flags to match your setup.
[Unit]

Description=Minecraft Server

After=network.target

[Service]

WorkingDirectory=/home/minecraft/minecraft-server

User=minecraft

ExecStart=/usr/bin/screen -DmS minecraft /usr/bin/java -Xmx3G -Xms3G -jar server.jar nogui

Restart=on-failure

RestartSec=10

[Install]

WantedBy=multi-user.target

Enable and start the service.

sudo systemctl daemon-reload

sudo systemctl enable minecraft

sudo systemctl start minecraft
Check on the server anytime with systemctl status minecraft, and jump into the live console with screen -r minecraft. Detach without stopping the server by pressing Ctrl+A, then D.
Step 7: Open the Right Port and Connect
Minecraft Java Edition only needs one port open, and it uses TCP, not UDP.
sudo ufw allow 25565/tcp

sudo ufw reload
Here is the part most guides skip. Many VPS providers, Truehost included, run a separate cloud-level firewall on top of the operating system’s own rules.
Opening the port with UFW is not enough on its own. Check your Truehost control panel for a firewall or security group section, and open port 25565 there as well.
Once both firewalls allow the connection, grab your public IP from the Truehost dashboard.
In the Minecraft Java client, open the Multiplayer tab, select Add Server, and enter that IP address.
Managing and Securing Your Minecraft VPS Long-Term
Getting the server online is only half the work. A few habits keep it running well for months instead of weeks.
- Back up the world folder on a schedule, not only before major changes. A simple cron job copying the folder nightly protects against accidental data loss.
- Update the server jar carefully when a new Minecraft version is released. Back up first, since some updates are not fully reversible.
- Harden SSH access by switching to key-based login and disabling root login entirely. Installing fail2ban adds another layer against repeated login attempts.
- Watch RAM and CPU usage with a tool like htop. Rising usage over time is a sign to move up a VPS tier before performance suffers.
Troubleshooting Common Minecraft VPS Problems
Most setup problems fall into a short list of repeat offenders. Here is how to spot and fix each one.
1) Players can’t connect at all. First, confirm the server is actually running with systemctl status minecraft. If it is running, check your VPS provider’s cloud firewall panel next. This step gets missed far more often than the local UFW settings do.
2) “Unsupported class file major version” appears on startup. This means the installed Java version is older than what the server or a plugin needs. Install the correct Java version for your Minecraft release and confirm it with java -version.
3) The server crashes with an OutOfMemoryError. This usually means Xmx was set too close to the VPS plan’s total RAM, leaving nothing for the operating system. Lower the value and confirm swap space is active as a backup.
4) “Address already in use” appears when starting the server. A previous server process is still holding port 25565. Find it with sudo ss -tulnp | grep 25565, then stop that process before restarting.
5) The server stops right after starting, with almost no log output. This is nearly always the unaccepted EULA. Open eula.txt and confirm the line reads eula=true.
6) Gameplay lags, or the tick rate drops as more players join. This points to the VPS plan running short on RAM or CPU for the current player count and plugin load. Check usage with htop, and move up a plan tier if it stays maxed out.
7) Disk space runs low over time. Log files and old backups build up quietly in the background. A cron job that prunes files older than a set number of days keeps this from becoming a problem.
FAQs
Can I run a Minecraft server on a VPS for free?
Some providers offer short free trials, but a genuinely free, always-on VPS is rare. Truehost’s entry-level plans start low enough that most players find the cost easy to justify once the server is up and stable.
What is the difference between a Minecraft server and a VPS?
The Minecraft server is the software that runs the game world and handles player connections. The VPS is the machine that software runs on. You need both, and the VPS is what makes the server available around the clock.
Can I run a modded Minecraft server on a VPS?
Yes, and Forge is the usual choice for mod support. Modded servers need more RAM than vanilla ones, so plan for at least a 6GB tier if your modpack is large.
What Linux distribution is best for a Minecraft server?
Ubuntu is the most common choice, thanks to wide documentation and long-term support releases. Debian works just as well and uses nearly identical commands throughout this guide.
Get Started With Self-Hosted Minecraft Servers
Moving a Minecraft server from a home connection to a VPS solves the problems that make home hosting frustrating.
The IP address stops changing. The server stays online without tying up your own computer. Friends connect without waiting for your upload speed.
Once the setup above is running, the server needs little beyond regular backups and the occasional plan upgrade.
If you would rather skip the terminal work entirely, Truehost’s managed VPS plans hand off the server administration side while you focus on the game itself.
Check current Cloud VPS pricing on the Truehost South Africa site and pick the tier that matches your player count.