 Web Hosting
 Windows HostingBuilt for Windows apps and websites – stability, speed and flexibility
 Reseller HostingLaunch a hosting business without technical skills or expensive infrastructure
 Affiliate ProgramRefer customers and earn commissions from sales across our platform
 Domain SearchFind and secure a domain name in seconds with our quick lookup tool
 CO ZA Domains
 All DomainsExplore domain names from over 324 TLDs globally – all in one place
 Free Whois Lookup Tool South Africa
 VPS
VPS Website Builder
 Online ShopSet up a sleek eCommerce store with zero coding knowledge
 SSLs
SSLs SupportAccess help articles, how-tos, and everything about our services
 Blog
Blog Contact UsReach our team instantly via live chat or drop us an email
A slow website costs you visitors before they even see your homepage. South African shoppers close a tab within seconds if a page takes too long to load.
Google notices too, and a sluggish site quietly loses ranking over time. Every abandoned cart and every dropped ranking traces back to the same root cause: a server that was never set up to handle real traffic.
Nginx handles connections differently from older web servers like Apache.
Instead of spinning up a new process for every visitor, it uses a small number of worker processes to manage thousands of connections at once.
This event-driven design keeps memory use low even when traffic climbs sharply.
For a South African audience, this design pays off in a specific way. Many visitors browse on mobile networks with variable speeds, so every millisecond a server saves adds up.
A tuned nginx server responds faster, and that speed shows up directly in bounce rates and conversions.
A properly configured nginx instance can serve tens of thousands of requests per second on modest hardware.
The rest of this guide walks you from a bare Ubuntu server to that kind of performance.
No prior nginx experience is required. By the end, your server will do the heavy lifting so your application code doesn’t have to.
Table of Contents
Before You Start: What You Need
A few things need to be in place before you touch the terminal. Getting these right first saves you from backtracking later.
- A VPS or dedicated server running Ubuntu. If you’re setting one up through truehost.co.za, choose a plan with enough RAM for your expected traffic, since worker connections scale with available memory.
- SSH access to the server, along with a non-root user that has sudo privileges.
- A domain name is pointed at your server’s IP address, if you plan to add SSL later in this guide.
- Basic comfort typing commands in a terminal. No nginx background is needed.
Once these are ready, you can move straight into the install.
Step 1: Installing Nginx on Ubuntu
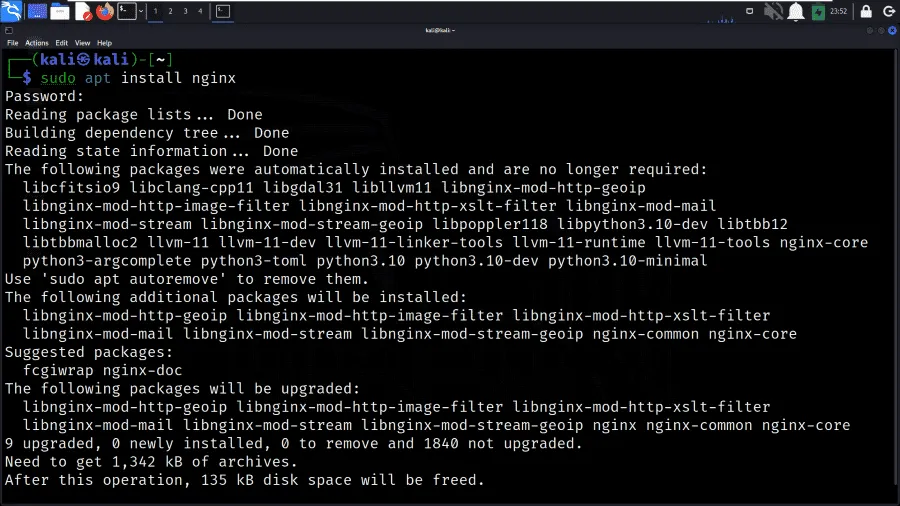
Start by updating your package list, so you install the latest stable version available.
sudo apt update

sudo apt install nginx -y
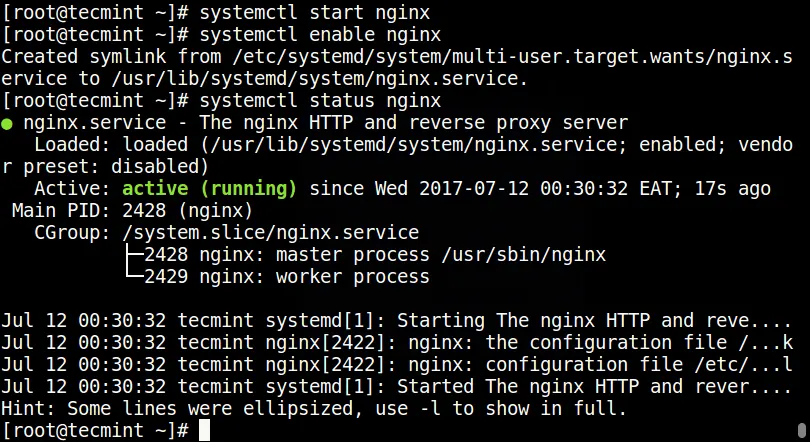
Once the install finishes, check that nginx started correctly.
sudo systemctl status nginxYou should see an “active (running)” status. Next, confirm that nginx is reachable by visiting your server’s IP address in a browser. You should see the default nginx welcome page.
If you’re running a firewall, open the ports nginx needs.
sudo ufw allow 'Nginx Full'

sudo ufw enable
The “Nginx Full” profile opens both port 80 for HTTP and port 443 for HTTPS, so you won’t need to revisit this step once SSL is added later. Finally, make sure nginx starts automatically after a reboot.
sudo systemctl enable nginxWith nginx installed and running, you’re ready to look at how its configuration is organized.
Step 2: Understanding the Nginx Configuration File Structure
Before changing anything, it helps to know where nginx keeps its settings and how those files connect.
The main configuration file lives at /etc/nginx/nginx.conf. This file sets global options and pulls in additional configuration through the include directive. Individual site configurations live in two related folders:
/etc/nginx/sites-available/holds configuration files for every site you’ve set up, whether active or not./etc/nginx/sites-enabled/contains symbolic links to the files in sites-available that are currently live.
This separation lets you disable a site without deleting its configuration, since removing the symlink is enough.
Inside these files, settings are organized into blocks. The http block wraps global web server settings, server blocks define individual websites, and location blocks control how specific URL paths behave within a server block.
Before editing any live configuration, back up the original file.
sudo cp /etc/nginx/nginx.conf /etc/nginx/nginx.conf.bakThis single habit saves you from a painful recovery if a change goes wrong. Now that the structure makes sense, you can start tuning it for performance.
Step 3: Tuning Worker Processes and Connections for Your Hardware
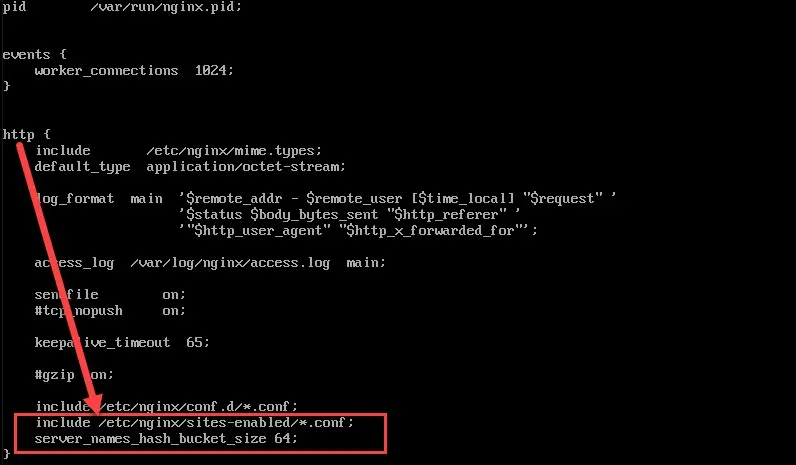
This is where the real performance work begins. Worker processes and worker connections form the foundation of everything else you’ll configure.
Open the main configuration file.
sudo nano /etc/nginx/nginx.confFind the worker_processes directive near the top and set it to match your CPU core count.
worker_processes auto;The auto value tells nginx to detect your core count and spawn one worker per core, which is the recommended setting for almost every server.
If you’d rather set this manually, check your core count first.
nprocNext, look inside the events block and adjust worker_connections. This setting controls how many simultaneous connections each worker process can handle.
events {

    worker_connections 1024;

    multi_accept on;

}
A server with 1GB of RAM typically handles 1024 connections per worker comfortably.
Larger servers with more memory can push this higher, often to 2048 or 4096. The multi_accept directive lets a worker accept multiple new connections at once instead of one at a time, which helps during traffic spikes.
To find your total connection capacity, multiply worker processes by worker connections.
Four workers at 1024 connections each give you 4096 concurrent connections, which comfortably covers most small and mid-sized business sites.
Save the file and test it before reloading.
sudo nginx -t

sudo systemctl reload nginx
With workers tuned to your hardware, the next step is reducing how much data nginx sends over the wire.
Step 4: Enabling Gzip Compression to Cut Load Times
Gzip compression shrinks text-based files before nginx sends them to a visitor’s browser, and the browser decompresses them instantly on arrival.
This single change can cut page weight dramatically for CSS, JavaScript, and HTML files.
Add this block inside the http section of nginx.conf.
gzip on;

gzip_vary on;

gzip_proxied any;

gzip_comp_level 5;

gzip_types text/plain text/css text/xml text/javascript

           application/javascript application/json application/xml;

gzip_min_length 256;
A compression level of 5 strikes a good balance between file size reduction and CPU cost.
Going higher rarely saves much more space but does cost more processing time per request.
The gzip_min_length setting stops nginx from wasting effort compressing tiny files where the overhead outweighs the benefit.
One common mistake is compressing files that are already compressed, like JPEG images or PDFs.
Doing so wastes CPU cycles for no real gain, since those formats are already dense. Stick to text-based file types in your gzip_types list.
To confirm compression is working, run a quick check from your terminal.
curl -H "Accept-Encoding: gzip" -I https://yourdomain.comLook for a Content-Encoding: gzip header in the response. If it’s there, compression is active, and your pages are already lighter.
Step 5: Configuring Caching for Repeat Visitors and Dynamic Content
Caching stores content so nginx doesn’t have to regenerate or refetch it for every request. This reduces load on your server and speeds up repeat visits significantly.
Start with static file caching, which tells browsers to store images, CSS, and JavaScript locally for a set period.
location ~* \.(jpg|jpeg|png|gif|ico|css|js|woff2)$ {

    expires 30d;

    add_header Cache-Control "public, no-transform";

}
Thirty days works well for assets that rarely change, like logos or stylesheets tied to a specific version.
If your site runs on WordPress or WooCommerce, add FastCGI caching to reduce the load PHP puts on your server.
fastcgi_cache_path /etc/nginx/cache levels=1:2 keys_zone=WORDPRESS:100m inactive=60m;fastcgi_cache_key "$scheme$request_method$host$request_uri";This setup caches the PHP-generated output itself, so nginx can serve a cached copy instead of asking PHP-FPM to rebuild the page from scratch every time.
For sites running nginx as a reverse proxy in front of another application, proxy caching works on the same principle.
proxy_cache_path /etc/nginx/proxy_cache levels=1:2 keys_zone=PROXYCACHE:100m inactive=60m;Caching speeds things up, but it also introduces a tradeoff. Cached content can go stale if you update your site and forget to clear the cache, so set sensible expiration times and purge the cache after major changes.
Step 6: Securing Nginx Without Sacrificing Speed
A fast server that’s easy to attack isn’t much of a win. These steps add security without adding noticeable overhead.
First, stop nginx from broadcasting its version number in response headers. This small change makes it slightly harder for attackers to target known vulnerabilities.
server_tokens off;Next, add rate limiting to block abusive traffic before it consumes your worker resources. This is especially useful against bots hammering login pages or search forms.
limit_req_zone $binary_remote_addr zone=mylimit:10m rate=10r/s;

server {

    location /login {

        limit_req zone=mylimit burst=20 nodelay;

    }

}
This example allows ten requests per second per visitor, with some burst room for legitimate traffic spikes. Adjust the numbers based on how your site actually gets used.
For SSL, nginx can terminate TLS connections directly, which centralizes your encryption in one place.
sudo apt install certbot python3-certbot-nginx

sudo certbot --nginx -d yourdomain.com
SSL does add a small CPU cost during the initial handshake, but modern hardware handles this without a noticeable slowdown.
Keep both nginx and
patched regularly, since security updates often include performance fixes too.
sudo apt update && sudo apt upgrade -ySet a recurring reminder to run this monthly, so patches don’t pile up unnoticed.
Step 7: Testing and Benchmarking Your Configuration
Every change you make to nginx should get tested before it goes live. Skipping this step is how small typos turn into full-outages.
Always run a syntax check before applying any configuration change.
sudo nginx -tIf the test passes, reload nginx instead of restarting it. A reload applies new settings without dropping active connections, while a full restart briefly takes the server offline.
sudo systemctl reload nginxTo see whether your tuning actually worked, run a simple load test before and after making changes. A tool like ab (Apache Bench) gives you a quick read on requests per second and response times.
sudo apt install apache2-utilsab -n 1000 -c 50 https://yourdomain.com/This sends 1000 requests with 50 running at the same time, then reports how your server handled the load.
Compare the results from before your tuning changes to after, and watch three numbers closely: average response time, requests handled per second, and any failed requests.
A drop in response time paired with zero failures is exactly what you’re aiming for.
Troubleshooting Common Nginx Errors After Configuration
Even a carefully tuned server runs into errors sometimes. Here’s how to read the most common ones and fix them quickly.
1) 502 Bad Gateway. This means nginx reached out to your backend, such as PHP-FPM or a Node app, and got no valid response. Check the error log first.
sudo tail -n 50 /var/log/nginx/error.logIf the log shows “connection refused,” the backend process isn’t running or is listening on the wrong port. Restart the backend service and confirm it’s bound to the address nginx expects.
2) 504 Gateway Timeout. The backend is running but taking too long to respond, often because of a slow database query or an overloaded PHP-FPM pool. Before raising nginx’s timeout settings, check whether the backend itself is the real bottleneck.
proxy_read_timeout 60s;Only increase this value after confirming the backend can’t be sped up directly, since a longer timeout just delays the same problem.
3) “Too many open files.” Under heavy traffic, nginx can hit the server’s file descriptor limit. Set the limit inside nginx’s own configuration rather than the shell, since a shell-based ulimit doesn’t survive a service restart.
worker_rlimit_nofile 65535;4) 413 Request Entity Too Large. This appears when a file upload or form submission exceeds nginx’s default 1MB body limit. Raise it to match what your application actually needs.
client_max_body_size 50M;Set this in the http server, or specific location block, depending on how narrowly you want the rule applied.
5) “Address already in use.” Nginx fails to start because another process, often a leftover Apache install, already holds port 80 or 443. Check what’s listening before restarting nginx.
sudo lsof -i :80Stop the conflicting service, then start nginx again. When you’re unsure what an error means, the error log almost always has the answer.
Match the bracketed error code, such as 111 for refused or 110 for timed out, against nginx’s documentation for a precise fix rather than guessing.
FAQs
How much traffic can a well-tuned nginx server handle?
This depends heavily on your hardware and the type of content you serve. A modest VPS with a few CPU cores can often handle several thousand requests per second for typical web pages.
Static content pushes that number even higher, since nginx serves files directly without involving a backend application.
Do I need a CDN if I already use nginx caching?
Nginx caching reduces load on your own server, but a CDN adds servers closer to your visitors around the world.
For a South African audience visiting a South African-hosted site, the gap often matters less than it would for a global audience.
Combining both still gives the best results for sites expecting international traffic.
Is Nginx good for WordPress or WooCommerce sites?
Yes, and FastCGI caching in particular makes a noticeable difference for PHP-heavy platforms like these.
WooCommerce stores benefit even more, since product pages and cart actions generate frequent database queries that caching can offload.
Pair nginx tuning with a caching plugin for the best combined result.
What is the difference between nginx and Apache for performance?
Nginx uses an event-driven model that handles many connections with few resources, while Apache traditionally spins up a process or thread per connection.
This makes nginx generally lighter under high concurrency, especially for serving static files. Apache still holds an edge in certain dynamic content scenarios through its module system, though nginx has closed much of that gap.
From Slow Default to Production-Ready Server
You started with a bare Ubuntu server and ended with a tuned, secured nginx instance built for real traffic.
Every setting along the way, from worker processes to gzip to caching, pushes your site closer to the speed your visitors expect.
Troubleshooting steps mean you’re ready for whatever error pops up next.
If you’d rather skip the manual setup and start from a server already tuned for performance, a managed VPS plan from truehost.co.za comes with nginx pre-installed and configured.
It’s a practical next step for site owners who want the results of this guide without doing every step by hand.