 Web Hosting
 Windows HostingBuilt for Windows apps and websites – stability, speed and flexibility
 Reseller HostingLaunch a hosting business without technical skills or expensive infrastructure
 Affiliate ProgramRefer customers and earn commissions from sales across our platform
 Domain SearchFind and secure a domain name in seconds with our quick lookup tool
 All DomainsExplore domain names from over 324 TLDs globally – all in one place
 Free Whois Lookup Tool South Africa
 VPS
VPS SSLs
SSLsOpenClaw was built for Linux, and some of its core features depend on a Linux environment to work reliably.
For instance, the Gateway (the background service that keeps your agent listening on WhatsApp, Telegram, Discord, or Slack) uses systemd to keep your agent running in the background, while Linux also provides the stable process management and file handling that OpenClaw expects.
First, you’ve got three ways to get OpenClaw running on a Windows machine: the Windows Hub app, a native PowerShell install, or WSL2.
However, OpenClaw’s own documentation points to WSL2 as the most Linux-compatible runtime available on Windows.

Unlike a native PowerShell installation, WSL2 provides a real Linux kernel sitting inside windows, so systemd, Linux file paths, and background services behave as intended.
That makes OpenClaw on WSL2 the most reliable installation mode for anyone planning to use the Gateway with platforms like WhatsApp, Telegram, Discord, or Slack.
The Windows Hub app is a good choice if you prefer a guided desktop experience, but WSL2 offers the closest match to a standard Linux deployment and is the best option for users who want maximum compatibility and stability.

Now, if your goal is to keep your agent online around the clock, running it on your own PC has one limitation: WSL only runs while your computer is on.
But for an always-on deployment, our Truehost OpenClaw VPS Hosting provides the same Linux-based environment without relying on your personal machine.
Before you begin, make sure you have:
- Windows 10 (build 19041 or later) or Windows 11 (check by pressing Win + R, typing
winver, and pressing Enter) - At least 8GB RAM (16GB recommended if you’ll also run a local AI model)
- 4–5 GB of available storage
- Virtualization enabled in your BIOS (Intel VT-x, AMD-V, or SVM Mode)
- A stable internet connection for downloading WSL, Ubuntu, Node.js, and OpenClaw dependencies
- An API key from Anthropic, OpenAI, Google, or another supported LLM provider
Finally, start the installation when your power is stable. Although South Africa’s grid has held up well through 2026, an interrupted download or installation can still mean starting over.
If you have everything ready, you can move on to setting up OpenClaw on WSL2.
Table of Contents
How to Install and Run OpenClaw on WSL (Step by Step)
Follow these five steps in order, and you’ll have OpenClaw installed, the Gateway running, and the web dashboard ready to use.
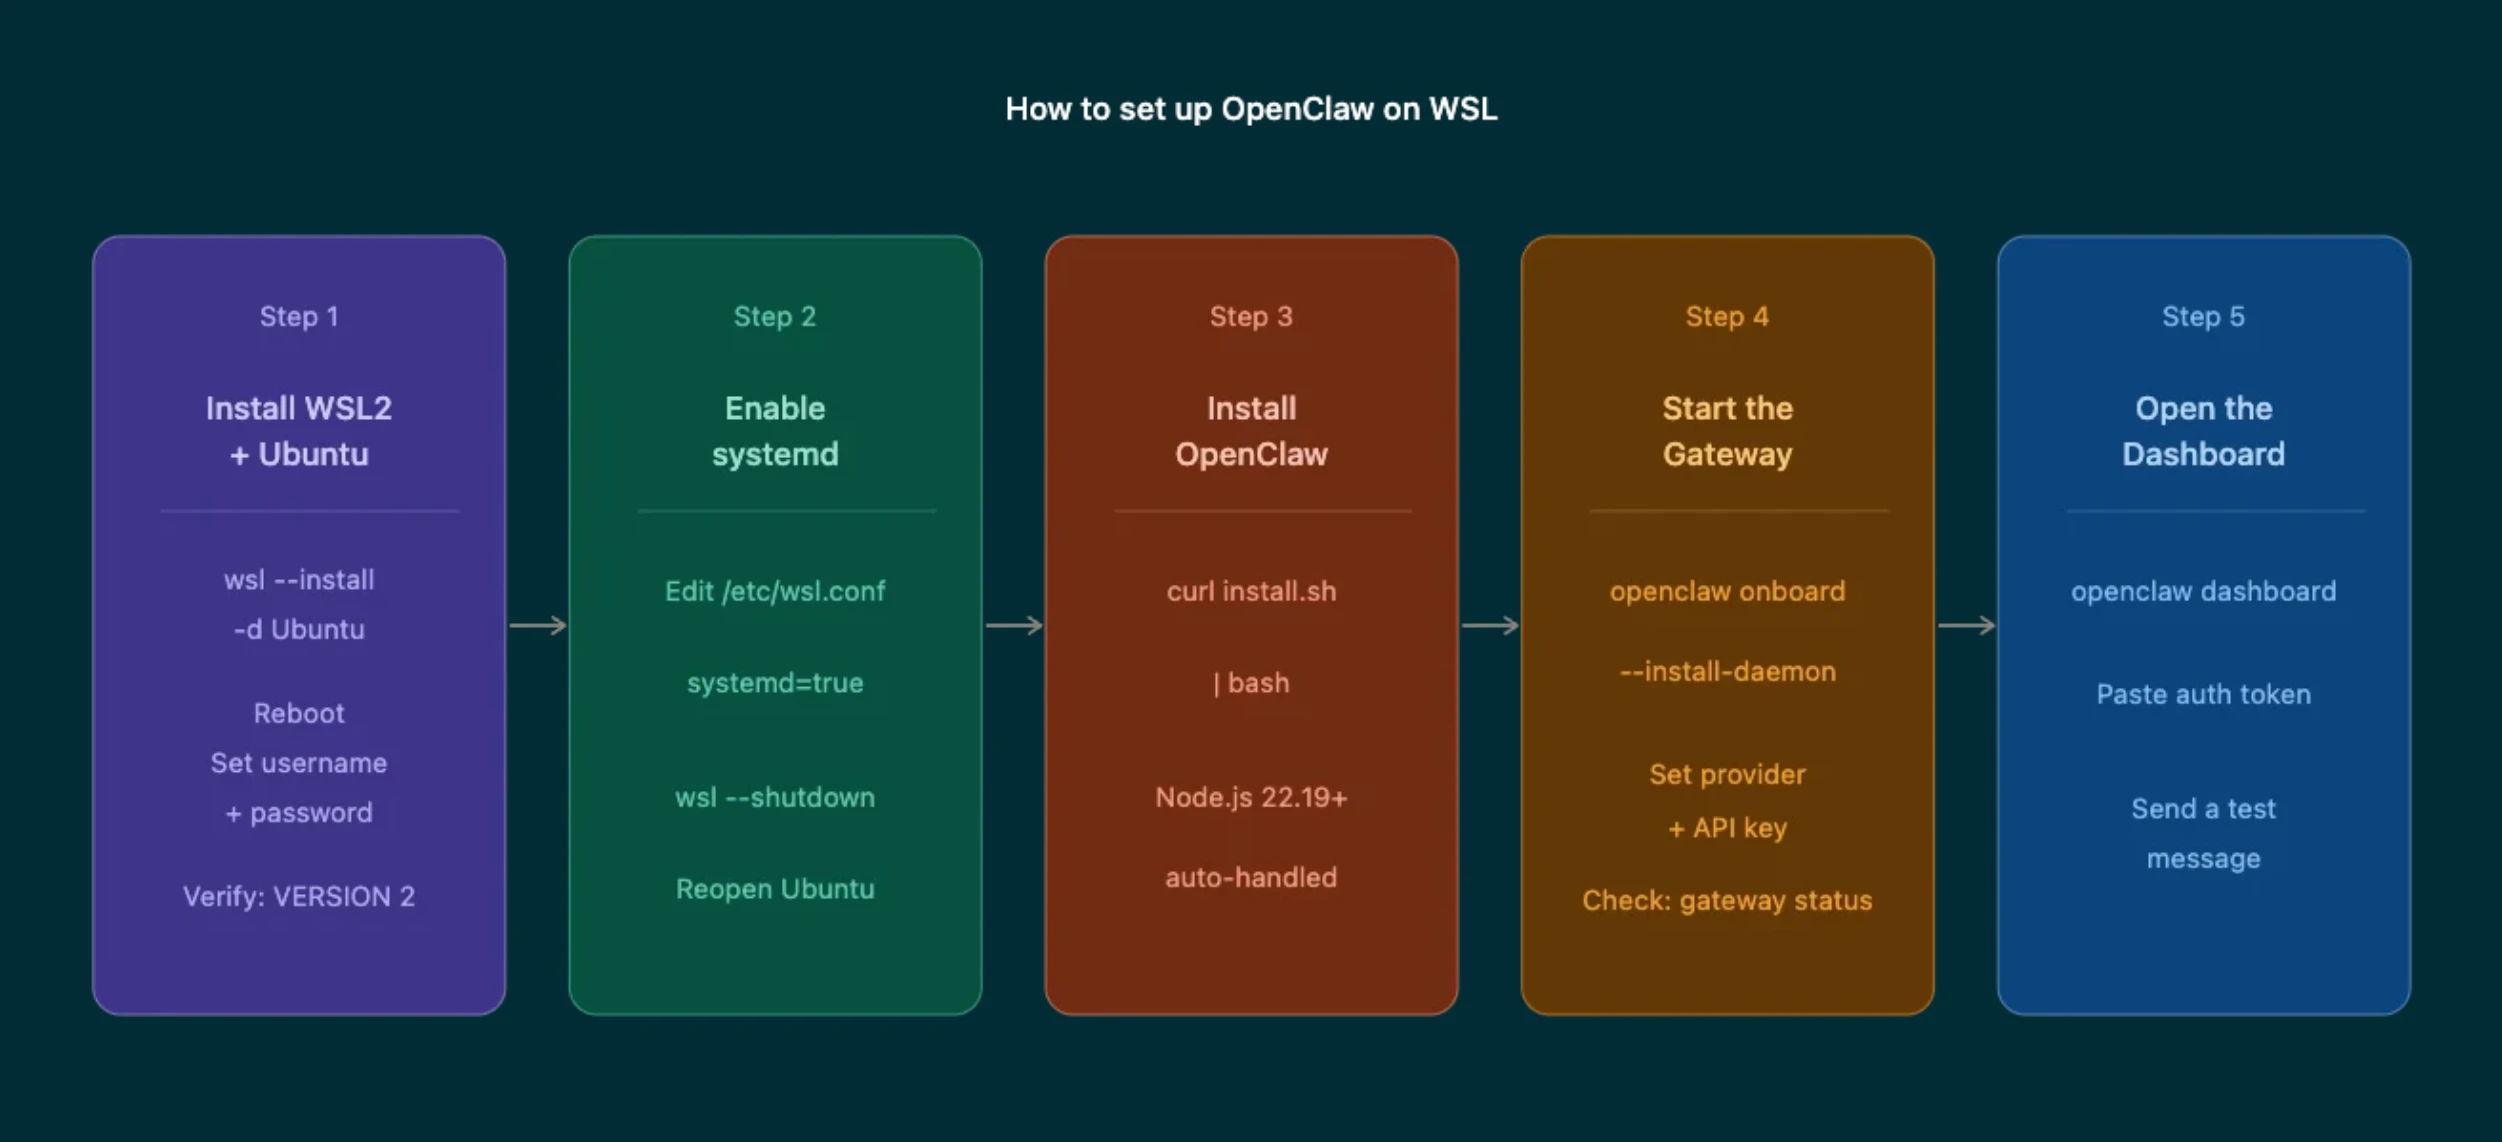
Step 1: Install WSL2 and Ubuntu
The first step is installing WSL2 along with Ubuntu, which provides the Linux environment OpenClaw is designed to run on.
Open PowerShell as an administrator by right-clicking the Start button and selecting Terminal (Admin). Then run:
wsl --install -d UbuntuThis single command handles most of the setup automatically. It enables the required Windows features, installs the WSL2 kernel, downloads Ubuntu, and prepares your system for Linux.
Once the installation is complete, restart your computer. This reboot is required before WSL2 is fully enabled.
After Windows starts again, Ubuntu will launch automatically and ask you to create a Linux username and password. These credentials are separate from your Windows account and will be used whenever you run commands with sudo.
Worth saying now, before the OpenClaw installer in the next step: don’t run it as root. An AI agent with shell access doesn’t need root-level permissions to do its job, and your regular user account is the safer default here.
Once you’re in, confirm you actually landed on WSL2 and not WSL1:
wsl --list --verboseLook for Version 2 next to your Ubuntu installation. If it shows Version 1, switch it to WSL2 by running:
wsl --set-default-version 2
wsl --set-version Ubuntu 2
After the conversion finishes, reopen Ubuntu and run wsl --list --verbose again to confirm it now shows Version 2. OpenClaw depends on WSL2’s Linux kernel and system capabilities, so completing this check now will help ensure the rest of the installation goes smoothly.
Step 2: Enable systemd for the OpenClaw Gateway
The OpenClaw Gateway relies on systemd to run as a background service. This allows your agent to stay connected even after you close the terminal. Since WSL doesn’t enable systemd by default, you’ll need to turn it on before installing OpenClaw.
Inside your Ubuntu terminal, run:
sudo tee /etc/wsl.conf >/dev/null <<'EOF'
[boot]
systemd=true
EOF
Next, return to PowerShell and restart WSL so the new setting is applied:
wsl --shutdownOpen Ubuntu again. From this point forward, WSL will start with systemd enabled, giving the OpenClaw Gateway the Linux service management it needs to run reliably in the background.
Step 3: Install OpenClaw Inside WSL
With systemd enabled, you’re ready to install OpenClaw. In your Ubuntu terminal, run the official installation script:
curl -fsSL https://openclaw.ai/install.sh | bashThe installer takes care of the required dependencies, including Node.js. OpenClaw requires Node.js 22.19 or later, with version 24 recommended.
If the correct version isn’t already installed, the script downloads and configures it automatically, so there’s no need to install Node.js yourself beforehand.
During the installation, you’ll see a brief security notice explaining the permissions OpenClaw requests. Worth actually reading rather than clicking past; it spells out exactly what OpenClaw can and can’t touch on your system.
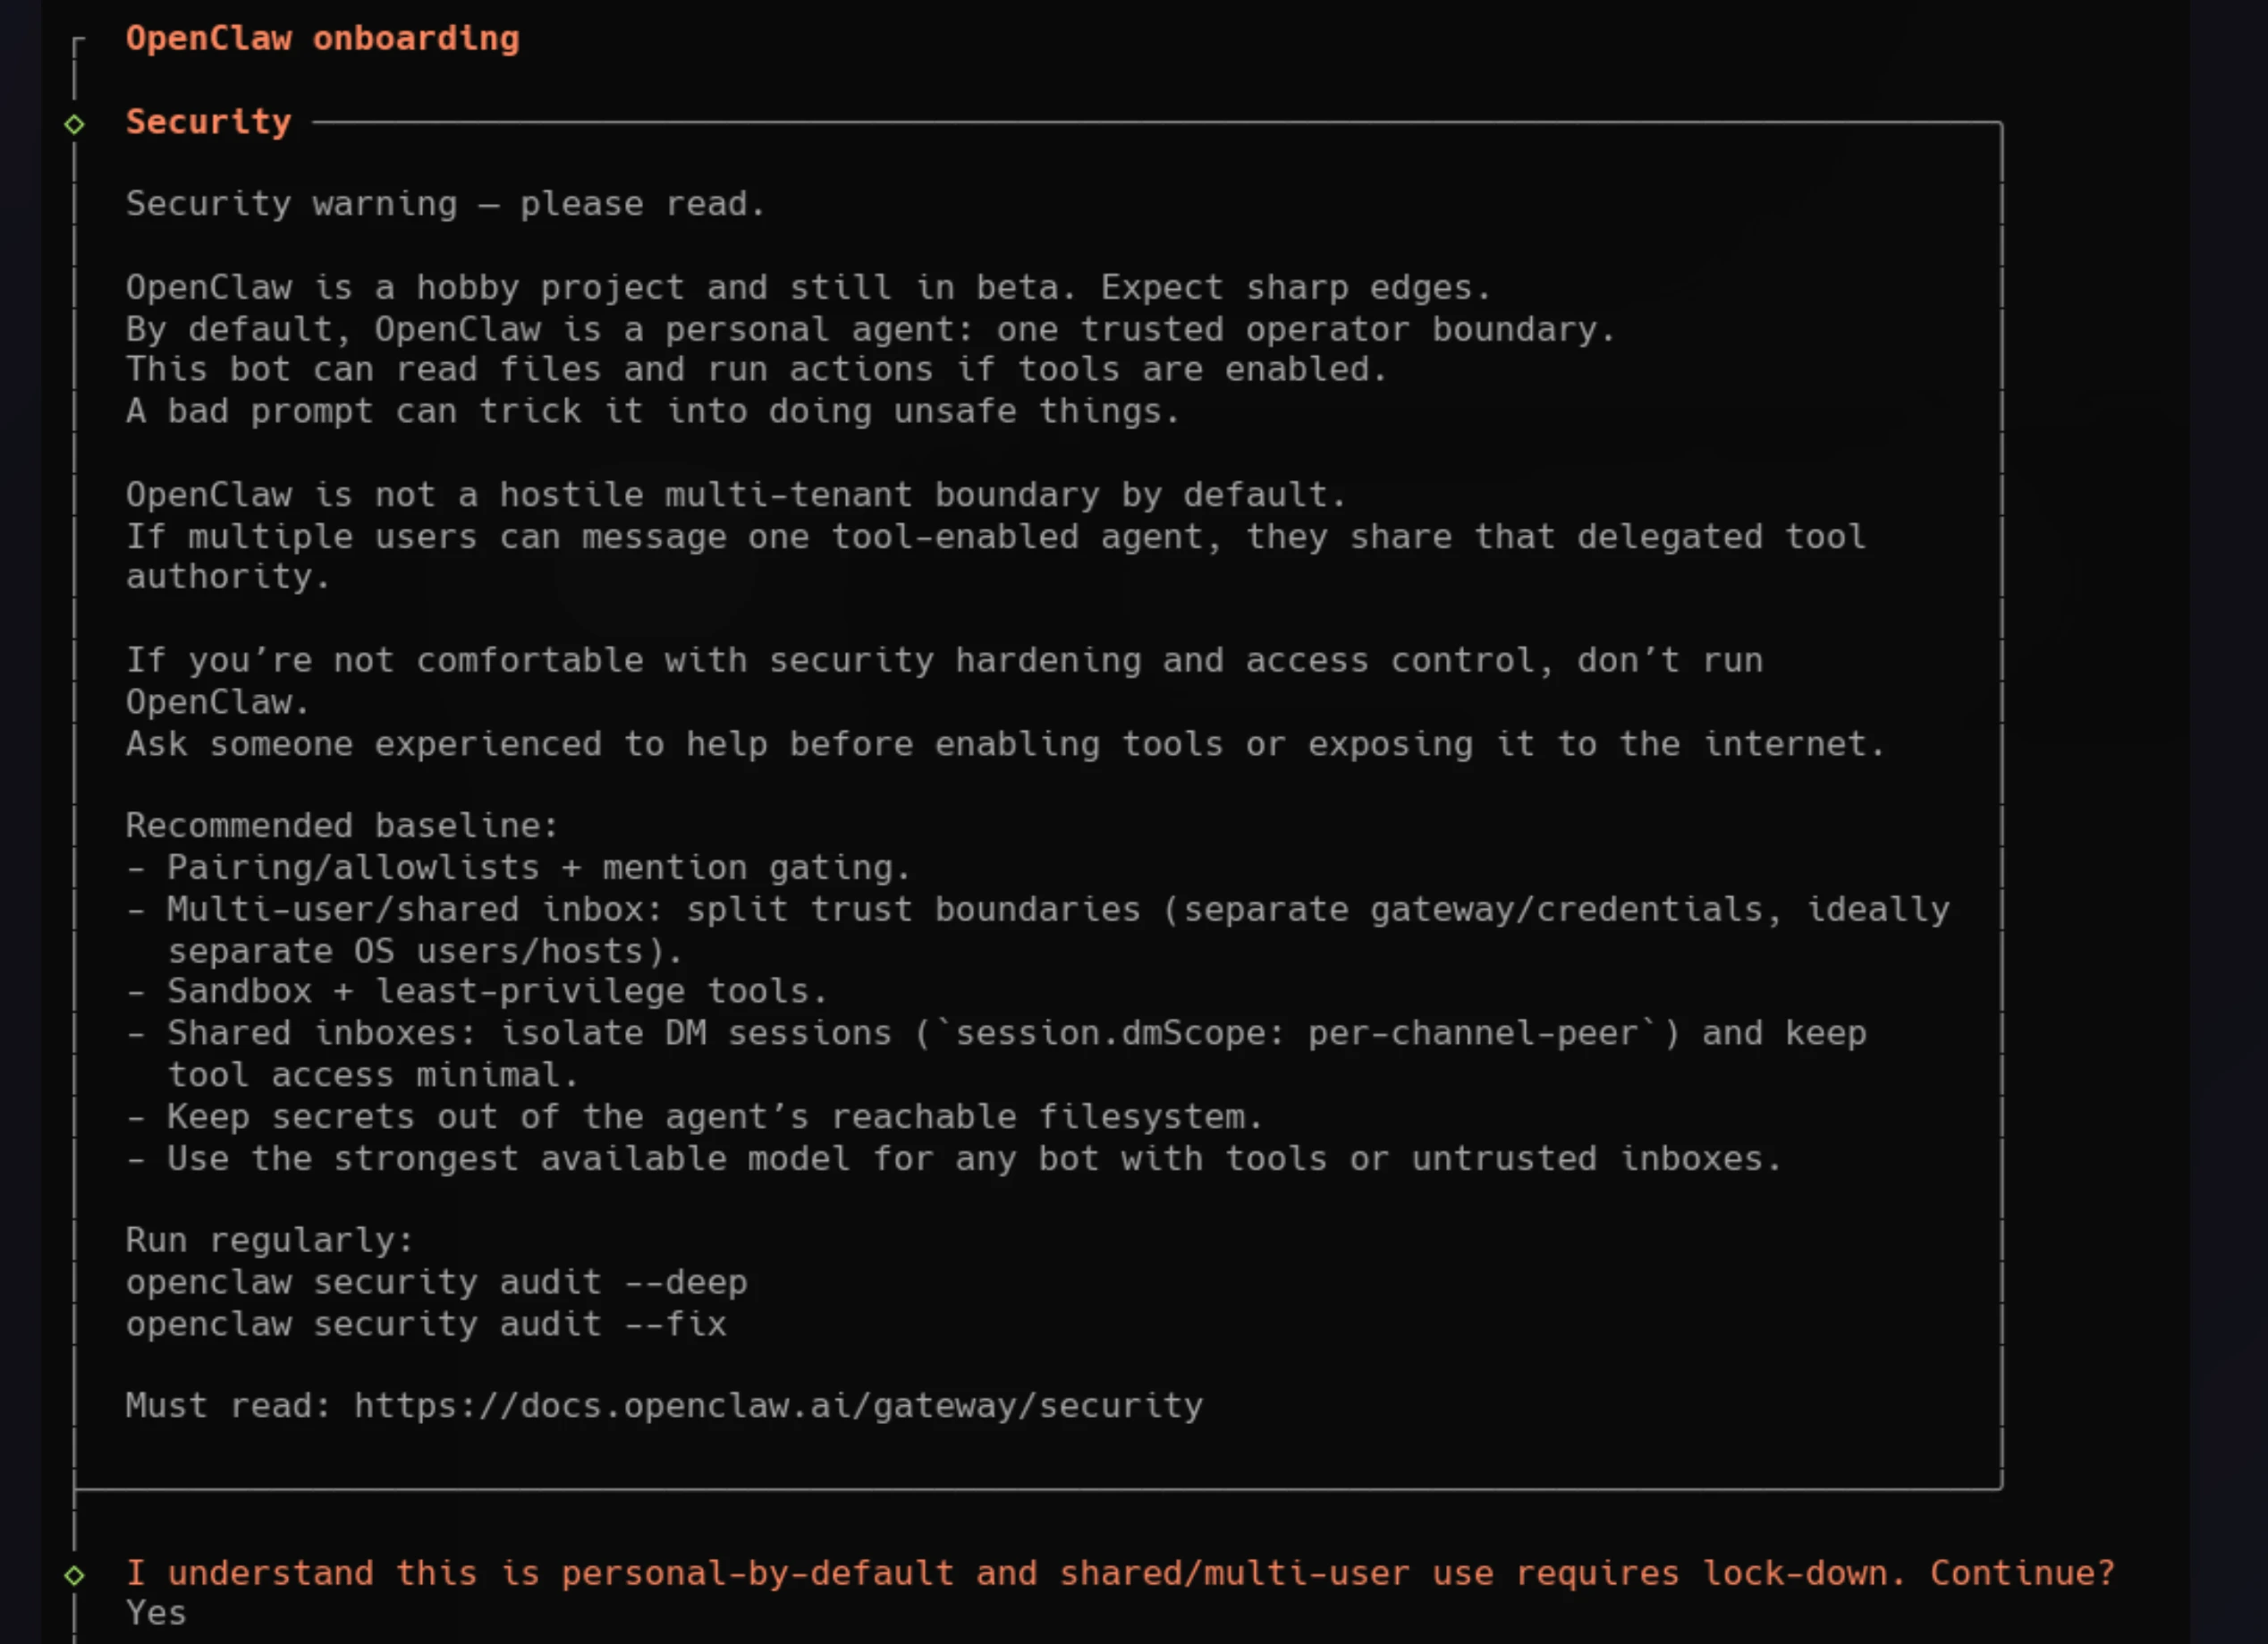
After reviewing it, choose QuickStart to continue with the recommended default configuration.
Step 4: Run Onboarding and Start the Gateway
With OpenClaw installed, the next step is to run the onboarding wizard. In your Ubuntu terminal, enter:
openclaw onboard --install-daemonThe wizard guides you through the remaining setup. You’ll choose your AI provider (OpenAI, Anthropic, Google), enter your API key, configure the Gateway, and install it as a background service so it starts and runs through systemd. About two minutes, start to finish.
When it’s done, check that the Gateway is actually live:

openclaw gateway statusIf it reports as running, you’re past the hardest part.
Step 5: Open and Access the Dashboard
This is where most people trip up: don’t type localhost:18789 directly into your browser. It’ll load, but you’ll get an “Unauthorized” message, since the raw URL doesn’t carry the credentials the dashboard needs. Instead, run this from Ubuntu:
openclaw dashboardThis opens the Control UI with a proper authentication token attached, so it pairs correctly the first time. If you’ve already got the token from onboarding and the dashboard is asking for it manually, paste it in there.
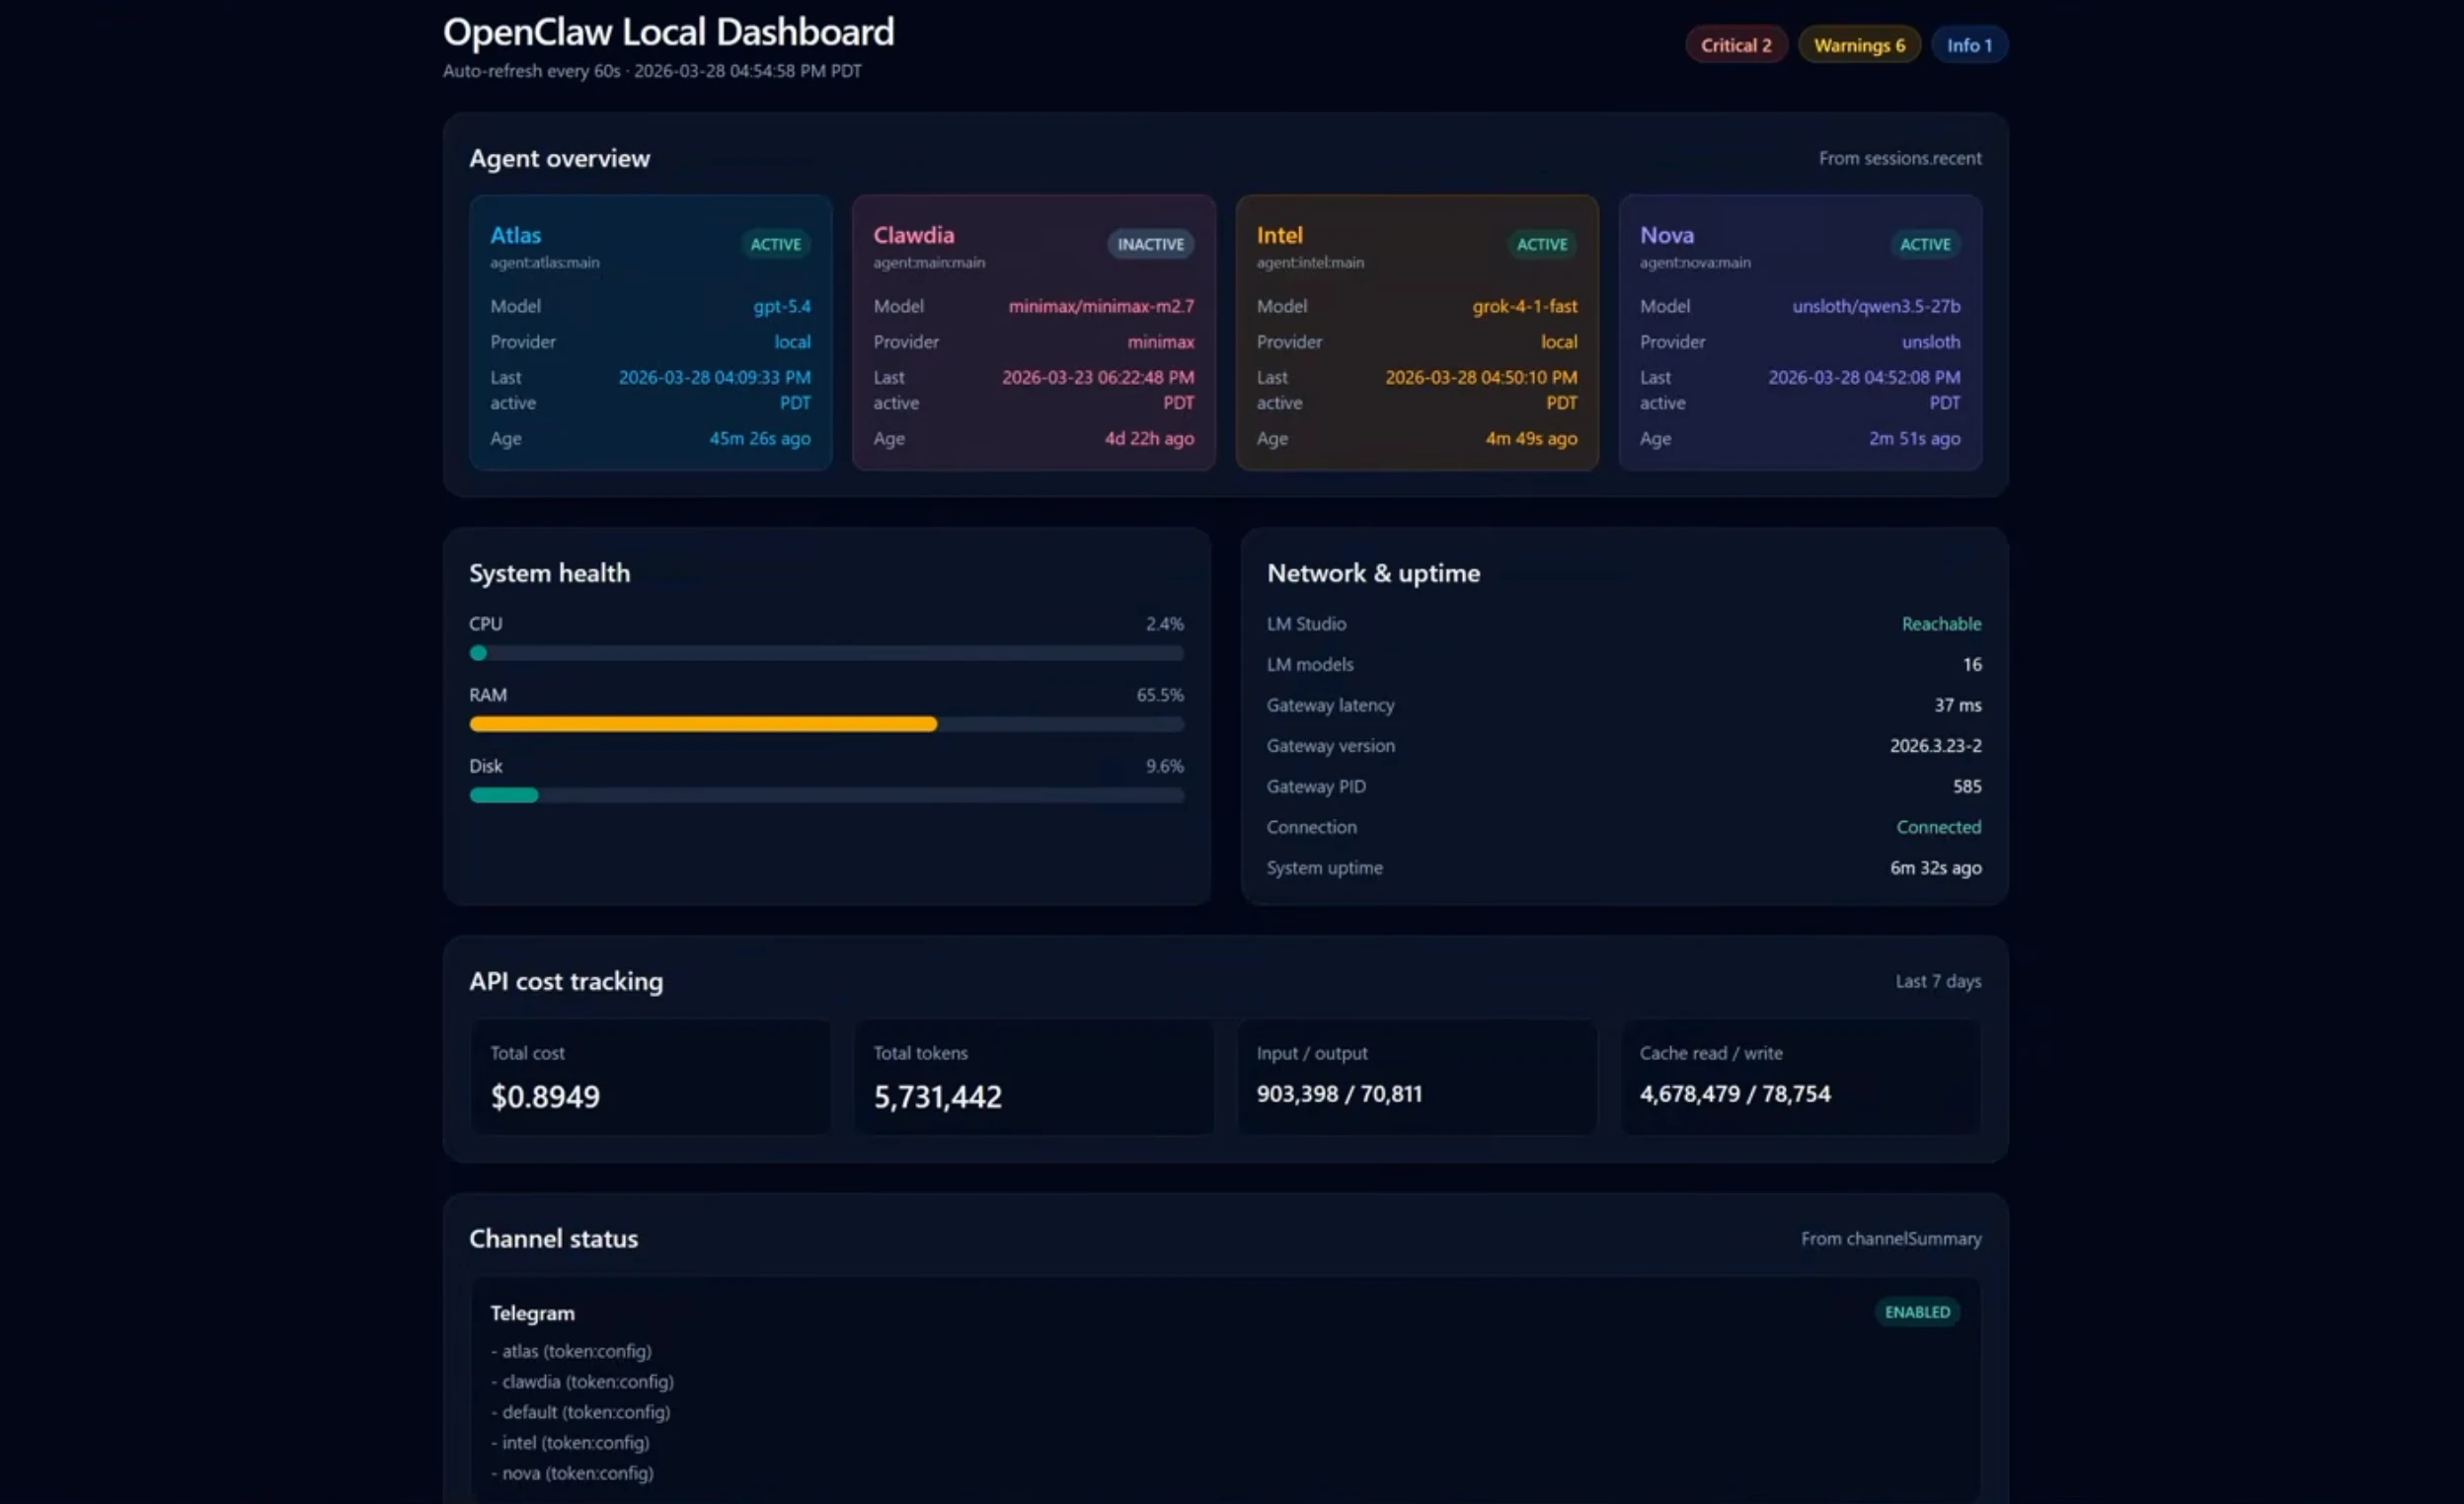
Once the dashboard opens successfully, create a quick test and confirm your agent responds as expected. At that point, your OpenClaw installation on WSL is complete and ready to use.
Common Setup Issues and Quick Fixes
Most OpenClaw installation problems can be resolved with a few quick checks. These are the issues most people run into most often and how to fix them.
1) openclaw: command not found
This usually means the OpenClaw executable isn’t available in your shell’s PATH. Check where npm installed the global packages by running:
npm config get prefixIf that location isn’t included in your PATH, add it to your ~/.bashrc file, save the changes, and restart your terminal.
2) ECONNREFUSED or Gateway Not Running
If the Gateway is inactive or you receive an ECONNREFUSED error, start the service again:
openclaw gateway startThen check its status:
openclaw gateway statusIf the Gateway stops immediately after starting, view the service logs to identify the cause:
journalctl -u openclaw -n 503) Dashboard Shows “Unauthorized”
This happens when you open localhost:18789 directly in your browser. Instead, launch the dashboard with:
openclaw dashboardThis command includes the authentication token required to access the dashboard.
4) Installation Appears Stuck
The first installation downloads several large dependencies, including Node.js and OpenClaw packages. Depending on your internet connection, this can take several minutes with little or no visible progress.
If the installation hasn’t completed after a reasonable amount of time, run the installer again with verbose output to monitor its progress.
If you’re still having trouble, run:
openclaw doctorThis diagnostic command checks your installation and reports common configuration issues.
OpenClaw on WSL FAQs
Do I need WSL2, or will WSL1 work?
Use WSL2. OpenClaw depends on features that aren’t available in WSL1, including systemd, which the Gateway requires to run as a background service.
What’s the minimum hardware to run OpenClaw on WSL?
A minimum of 8GB RAM is recommended for a smooth experience, although 4GB of RAM is the technical floor, along with 4–5GB of free storage. If you plan to run a local AI model alongside OpenClaw, 16GB RAM is a better choice.
Why does my dashboard say “Unauthorized”?
The dashboard was likely opened by browsing directly to localhost:18789. Launch it with:
openclaw dashboardThis automatically includes the authentication token required to sign in.
Does OpenClaw keep running if I close the WSL terminal?
Yes. Once you’ve enabled systemd and completed onboarding with the --install-daemon option, the Gateway continues running after you close the terminal. Skip that step, and closing the terminal takes the Gateway down with it.
Is WSL good enough for regular use, or should I use a VPS instead?
WSL is an excellent option for development, learning, testing, and personal projects. If your agent needs to stay online continuously or serve users around the clock, hosting it on a VPS is the more reliable solution.
Keep OpenClaw Running 24/7: WSL vs. a Truehost VPS
After enabling systemd and installing the Gateway as a daemon, OpenClaw continues running even after you close the Ubuntu terminal. The one limitation is that WSL only runs while your Windows computer is powered on.
For personal use, local development, or testing, that’s usually enough.
If you’re running a Telegram bot, a business assistant, or another service that needs to respond around the clock, your PC stops being fine. If it’s turned off, asleep, disconnected from the internet, or restarting after a Windows update, OpenClaw goes offline with it.
This is exactly the gap a VPS closes. Our OpenClaw VPS Hosting runs the same setup you just walked through, except it lives on a server that’s on whether or not your own machine is.
You have no browser tabs or other software competing for RAM or CPU.
Basically, if WSL got OpenClaw running today, a VPS is what keeps it running every day after.