 Web Hosting
 Windows HostingBuilt for Windows apps and websites – stability, speed and flexibility
 Reseller HostingLaunch a hosting business without technical skills or expensive infrastructure
 Affiliate ProgramRefer customers and earn commissions from sales across our platform
 Domain SearchFind and secure a domain name in seconds with our quick lookup tool
 CO ZA Domains
 All DomainsExplore domain names from over 324 TLDs globally – all in one place
 Free Whois Lookup Tool South Africa
 VPS
VPS Website Builder
 Online ShopSet up a sleek eCommerce store with zero coding knowledge
 SSLs
SSLs SupportAccess help articles, how-tos, and everything about our services
 Blog
Blog Contact UsReach our team instantly via live chat or drop us an email
A subdomain is a prefix added to your main domain, such as blog.example.com.
It acts like a separate section of your website while remaining connected to your main domain.
Subdomains are useful for organizing content, testing new features, creating online stores, hosting support portals, or serving different regions and languages.
Learning how to create a subdomain gives you more flexibility to manage and grow your website.
While subdomains and subdirectories can both perform well in search engines, the right choice depends on your site’s structure.
If a section needs its own design, technology, or team, a subdomain is often the better option.
If it closely supports your main website, a subdirectory is usually the simpler choice.
Prerequisites Before Creating a Subdomain in cPanel
Before you start, check these boxes.
- You need an active hosting account with cPanel access.
- Your main domain must already be added and pointed correctly.
- You should know the basics of File Manager or FTP. You’ll need this later, to upload content.
- You need to understand DNS propagation. It usually takes 5–30 minutes. In rare cases, it can take up to 48 hours.
If you’re missing any of these, sort them out first. It will save you time later.
A quick note on DNS propagation, since it trips up a lot of first-timers.
Propagation is simply the time it takes for changes to spread across the internet’s DNS servers.
Your local internet service provider might update in minutes. Others further away can take longer. This is normal. It’s not a sign that something has gone wrong.
Don’t have hosting yet? You can open a domain with us and get cPanel access from day one. Check our domain and hosting prices to see which options fit your budget.
Table of Contents
How to Create a Subdomain in cPanel
Now for the main process. This is how to create a subdomain in cPanel, step by step.
Step 1: Log into cPanel
Access cPanel through your hosting provider’s client dashboard. Or go directly to yourdomain.com/cpanel.
You’ll need your cPanel username and password. If you host with us, you’ll find these details in your welcome email or client area.
Step 2: Open the Domains Tool
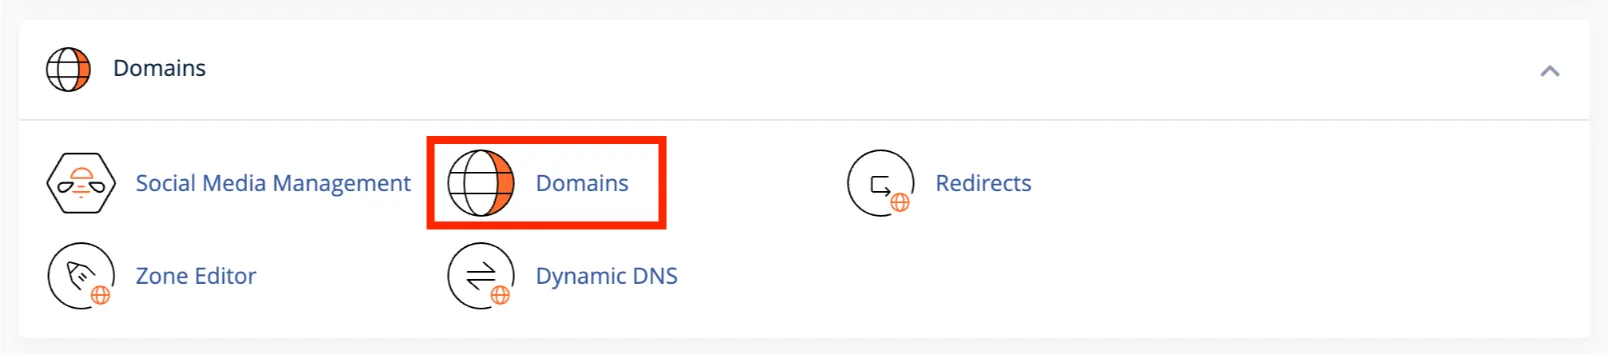
Once you’re inside cPanel, look for the Domains section.
Click ‘Domains.’
Click on ‘Create new domain.’
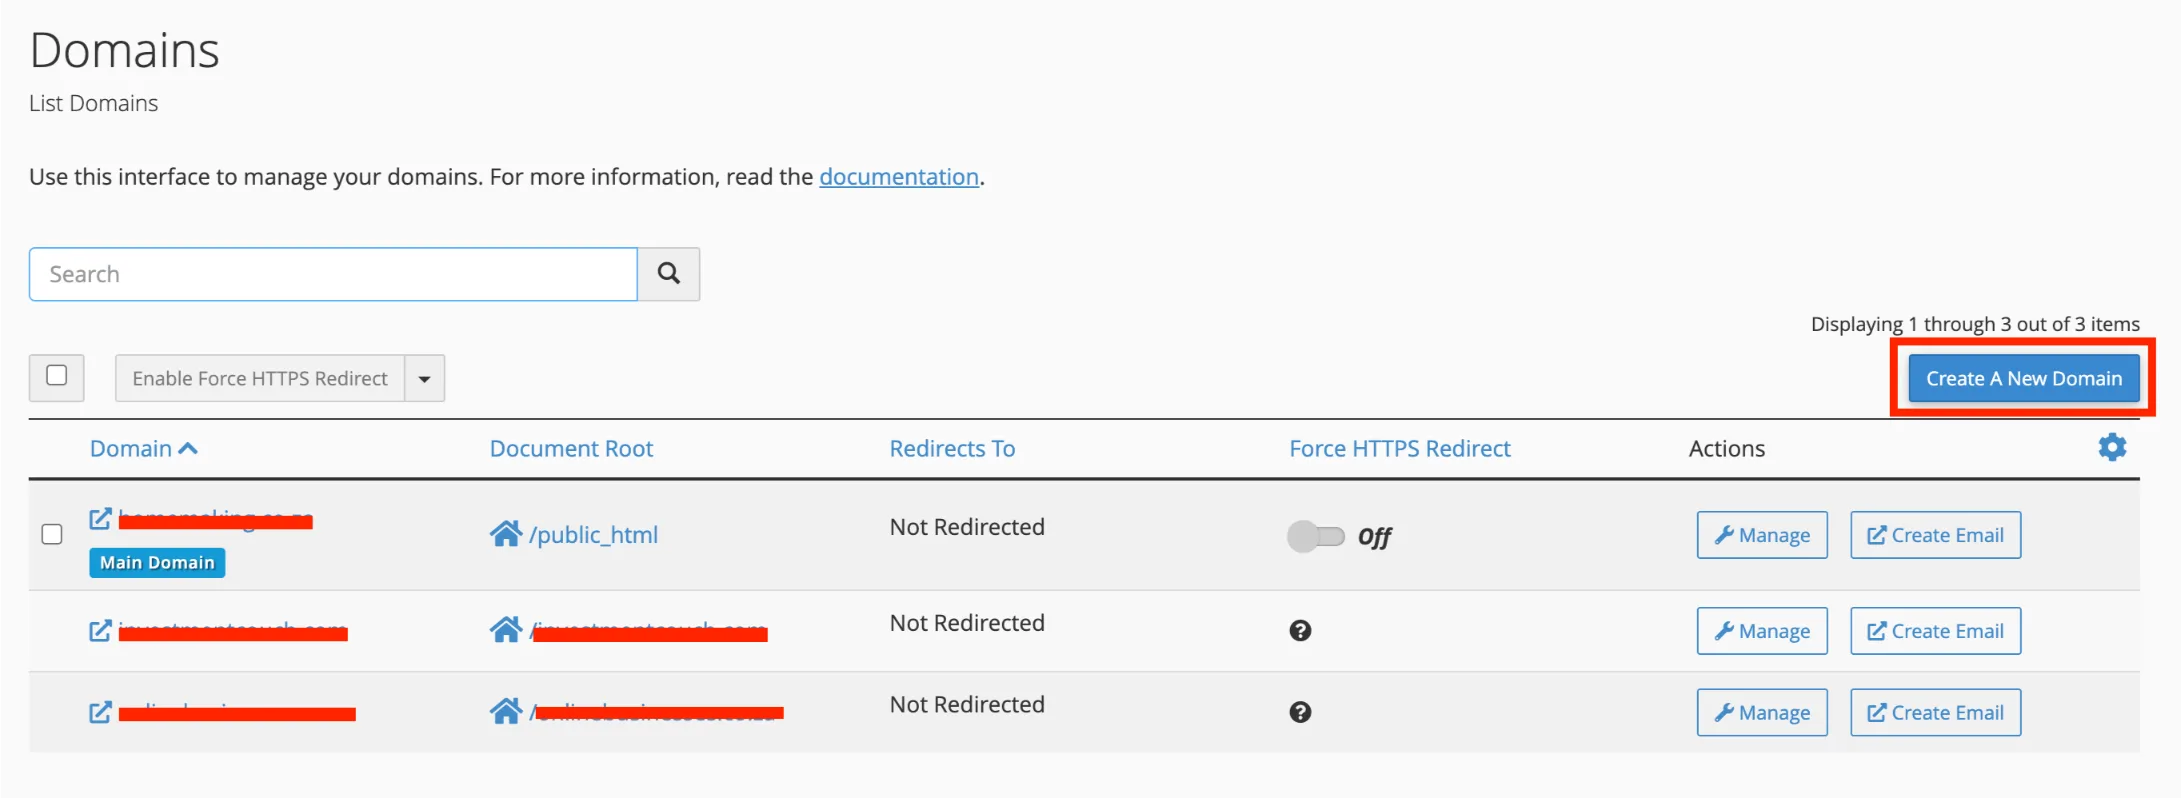
This single screen handles subdomains, addon domains, and parked domains. Don’t worry. You’ll only fill in what a subdomain needs.
Step 3: Enter the Subdomain Name
Type the full subdomain you want. For example: blog.yourdomain.com.
Keep it short. Keep it relevant to what the subdomain will do.
Avoid reserved names. These include:
- www
- ftp
- cpanel
- webmail
Reserved names are often already in use by your server. Using them can cause conflicts or errors.
Step 4: Set the Document Root
This step confuses a lot of first-time users. Here’s the simple version.
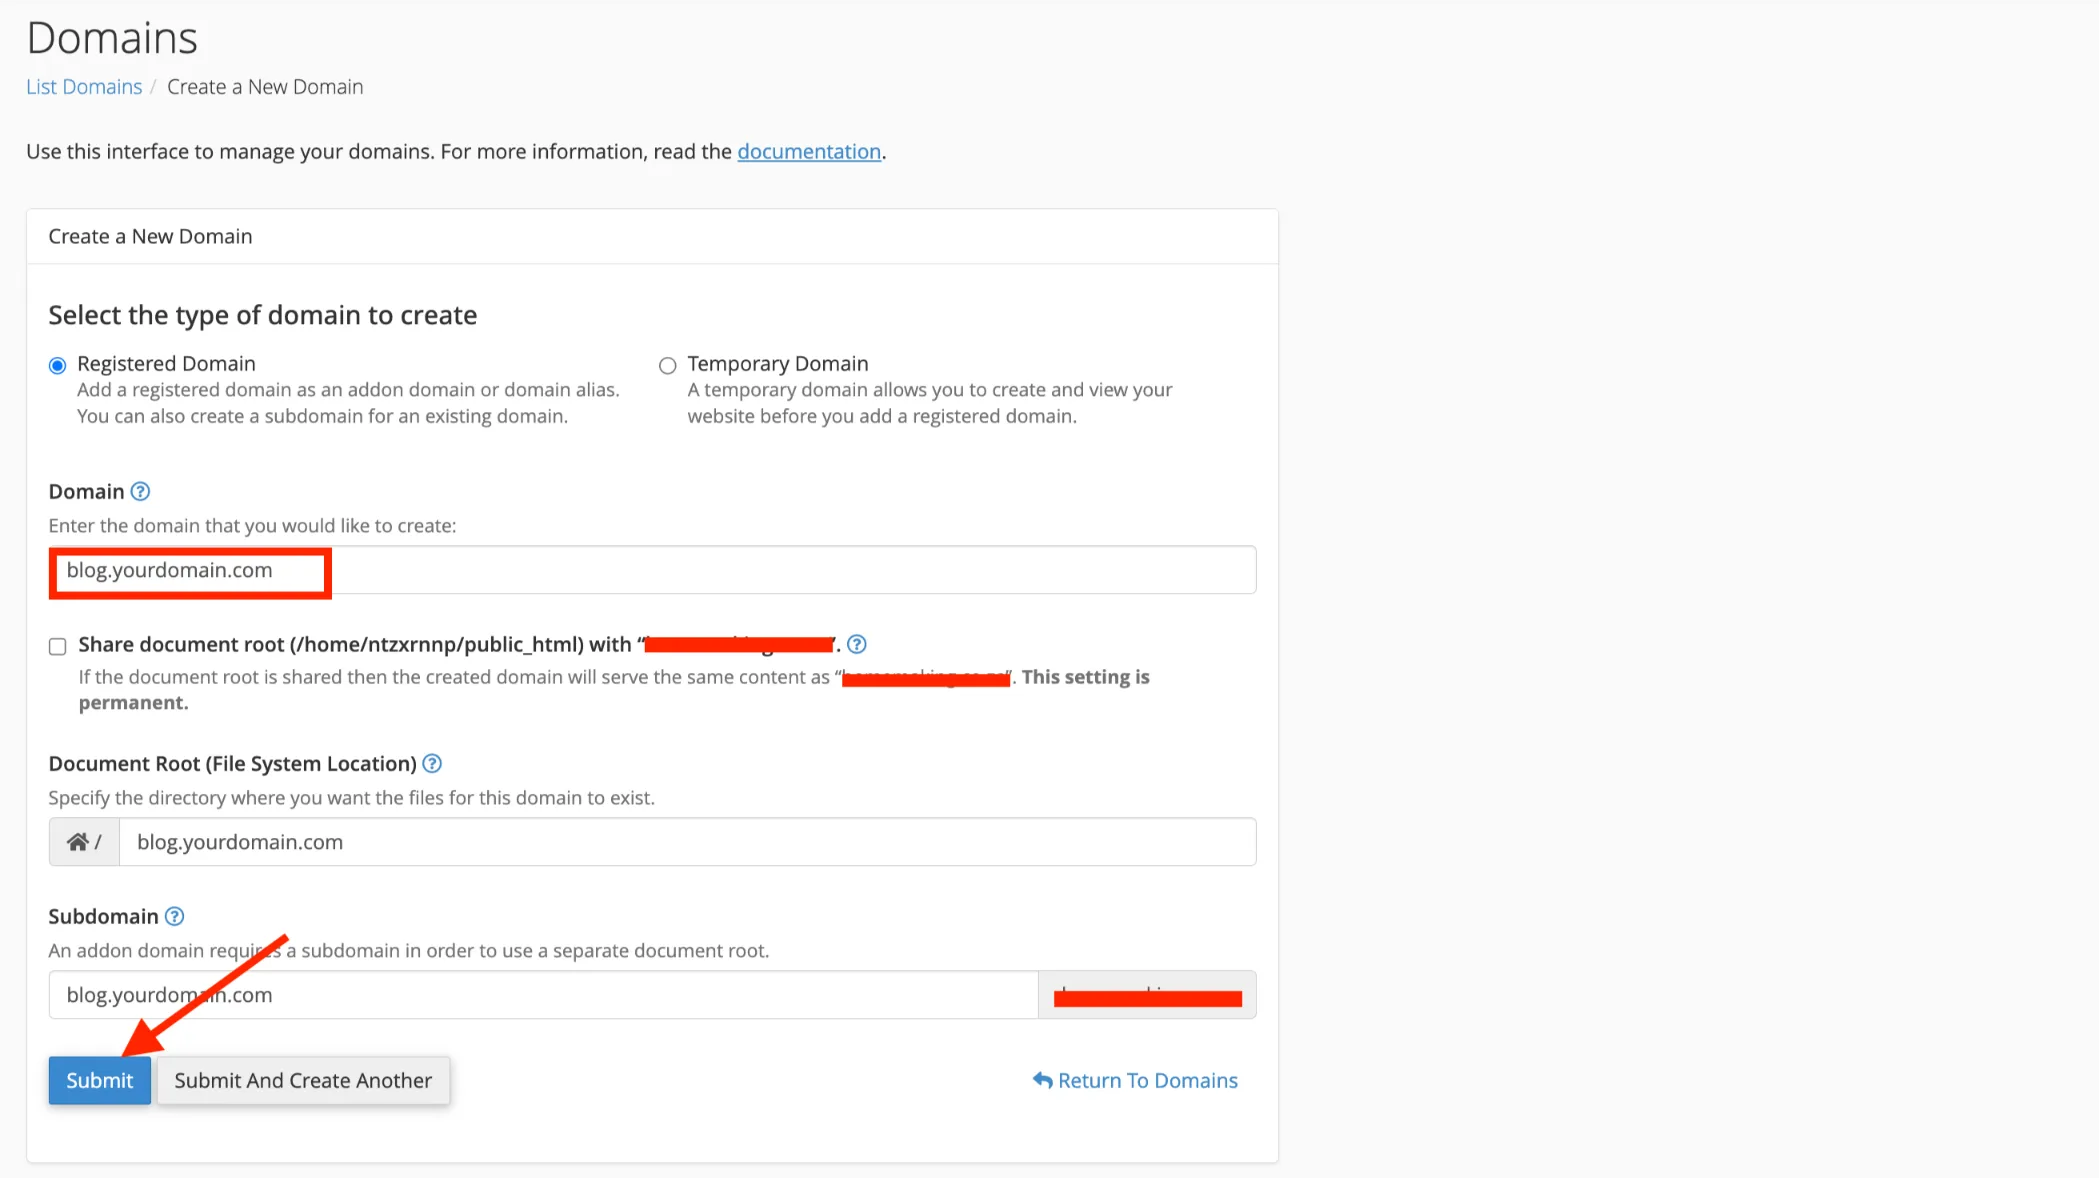
You’ll see a checkbox for ‘Share document root.’ This decides where your subdomain’s files live.
- If you leave it checked, your subdomain mirrors your main site’s content.
- If you uncheck it, your subdomain gets its own folder. Its content is independent of your main site.
For most use cases, uncheck this box. Blogs, stores, and staging environments all need their own space to work properly.
Leave it checked only if you have a very specific reason to mirror your main site.
Step 5: Click Submit
Once your details are set, click Submit.
A confirmation message will appear right away. But your subdomain won’t be live instantly.
Propagation usually takes 5–30 minutes. In rare cases, it can take 24–48 hours. Grab a coffee. It’s almost ready.
How to Upload Content to Your New Subdomain
Right now, your subdomain exists, but it’s an empty folder.
Nothing shows up until you add files to it. There are three ways to do that.
First, confirm your subdomain’s folder path
Before uploading anything, don’t assume the path. Depending on your hosting setup, cPanel may place your subdomain’s folder in one of two spots:
- Nested inside your main site, like
public_html/blog - Or as its own folder at the root level, like
blog.yourdomain.com(sitting next topublic_html, not inside it)
To confirm which one applies to you: in cPanel, go to Domains, find your subdomain in the list, and check the Document Root column. That tells you the path your files need to go into.
Via File Manager
This is the easiest method if you’re not comfortable with FTP.
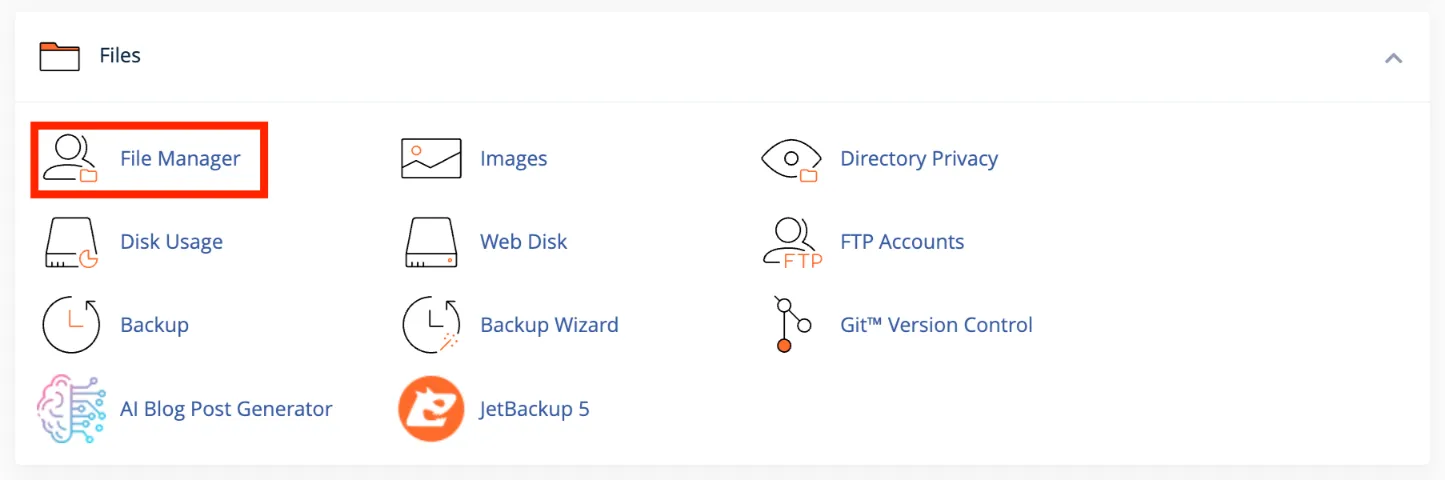
- In cPanel, open File Manager.
- Go to the folder you confirmed in the Document Root column; this could be
public_html/blogor a standalone folder likeblog.yourdomain.com. - Upload your files directly here, using the Upload button in File Manager’s toolbar.
Everything you put inside this folder is what visitors will see when they open your subdomain.
Via FTP
This method is better if you’re uploading a large number of files at once, or you already have an FTP workflow set up (using something like FileZilla).
- Connect to your hosting account using your FTP credentials (host, username, password, port).
- Go to the same path:
public_html/subdomain-folder. - Drag and drop your files into that folder.
The destination folder is identical to the File Manager method; you’re just using a different tool to get there.
Using Softaculous (fastest option for WordPress)
If you want to run WordPress on your subdomain, skip manual uploads entirely.
- In cPanel, open the Softaculous App Installer.
- Choose WordPress.
- On the install screen, select your subdomain (e.g.,
blog.yourdomain.com) as the install location. - Click Install.
Softaculous builds the WordPress files, creates the database, and connects everything automatically so your subdomain has a working site in a few minutes, without touching File Manager or FTP at all.
One thing to double-check either way: make sure you’re uploading into the subdomain’s folder, not the main site’s
public_htmlroot. That mismatch is the single most common reason a subdomain shows the wrong content, or nothing at all, once it’s live.
How to Set Up SSL for Your Subdomain
Every subdomain needs SSL. Without it, browsers will flag your site as ‘Not Secure.’
The good news: most hosts, including us, auto-issue free SSL certificates. This uses AutoSSL, powered by Let’s Encrypt. It happens automatically after DNS propagates.
If SSL doesn’t activate on its own:
You can manually trigger a check. In cPanel, go to SSL/TLS Status. Find your subdomain in the list. Click ‘Run AutoSSL.’
If it still doesn’t work:
- Wait for DNS propagation to finish. SSL can’t issue until DNS is fully resolved.
- Check your DNS records. Make sure your subdomain points to the correct IP address.
One thing to know: Let’s Encrypt enforces rate limits to keep its system fair for everyone.
The standard limit allows up to 50 new certificates per registered domain, per week, but renewals with the same set of names face a tighter cap of 5 per week.
If you’re repeatedly triggering AutoSSL on the same subdomain while troubleshooting, you can hit that renewal limit and get locked out for a few days.
Space out your attempts, and fix the underlying DNS issue first rather than re-running AutoSSL over and over.
How to Create a Wildcard Subdomain (Optional/Advanced)
A wildcard subdomain looks like this: *.yourdomain.com.
It catches every subdomain under your domain. This includes ones you’ve already created. It also includes ones that don’t exist yet.
When would you need this?
- SaaS platforms that create a new subdomain for every customer
- Multi-tenant sites where each user or client gets their own space
How to set it up:
The process is nearly the same as a regular subdomain. Go to the Domains tool in cPanel. Enter * as the subdomain prefix, followed by your domain.
This is an advanced setup. Most standard websites won’t need it. But if you’re building a platform with many user-generated subdomains, it saves enormous manual work.
A word of caution. Wildcard subdomains also catch typos and unintended requests.
Make sure your application logic can handle unexpected subdomain names gracefully, rather than throwing errors that confuse visitors.
If you’re building something at this scale, a shared hosting plan usually isn’t enough. This is where a VPS or dedicated server from us makes more sense.
You get the resources and control to manage wildcard subdomains, custom scripts, and higher traffic without slowing down your main site.
Common Errors and Troubleshooting
Even with the steps above, things can go wrong. Here’s a quick reference.
| Issue | Likely Cause | Fix |
|---|---|---|
| Subdomain shows “Not Found” | DNS has not yet propagated | Wait up to 24 hours. Check a DNS propagation tool. |
| SSL not working | Certificate not yet issued | Run AutoSSL manually, or wait for propagation. Remember the 5-per-week renewal limit on identical certificate sets. |
| Subdomain shows wrong content | Document root misconfigured | Recheck the folder path in the Domains tool. |
| Can’t create subdomain, name taken/reserved | Using a reserved word | Choose a different prefix. |
Most subdomain problems come down to one of these four issues. Work through this table before assuming something is broken on a deeper level.
Create a Subdomain Now
Creating a subdomain isn’t complicated. Log in. Open the Domains tool. Type your subdomain name. Set your document root. Click Submit.
That’s five steps. Most people finish in under ten minutes.
You can be launching a blog, testing a redesign, opening a store, or building a support portal; a subdomain gives you room to grow without disturbing your main site.
Ready to set one up? Open a domain with us, or check your current plan’s subdomain limits and pricing to get started today.
If your project is bigger than a simple subdomain, think of a full staging server, a multi-tenant SaaS app, or an automation workflow.
Our VPS and dedicated server plans give you the room to scale. We also offer OpenClaw hosting for AI agent deployments, AI Workers for automation tasks, and N8n Hosting if you’re building workflows that connect your subdomains to other tools.
Create a Subdomain in cPanel FAQs
Do I need to buy a new domain to create a subdomain?
No. A subdomain uses your existing domain. You don’t need to register or pay for a separate one.
How long does a subdomain take to go live?
Usually 5–30 minutes after you click Submit. In rare cases, full DNS propagation can take up to 48 hours.
Can I use a subdomain for email hosting?
Yes. You can set up email accounts on a subdomain the same way you would on your main domain, through cPanel’s Email Accounts tool.
Can I move a subdomain to its own hosting account later?
Yes. You can migrate a subdomain’s files and database to a new hosting account. This is common when a blog or store outgrows shared hosting and needs a VPS or dedicated server.
Does a subdomain hurt my main site’s SEO?
Not directly. Google treats subdomains and subdirectories as equally crawlable and indexable. But a subdomain often needs its own SEO effort, since it’s frequently treated as a somewhat separate property. Verify it separately in Google Search Console and build its own relevant content.
Is there a limit to how many subdomains I can create?
This depends on your hosting plan. Some plans offer unlimited subdomains. Others cap the number. Check your plan details and pricing to confirm your limit.
If you’re planning to run several subdomains for staging, testing, or client projects, it’s worth checking this limit before you start building. Upgrading later is simple, but it helps to know your ceiling upfront.